
King Tiger "Für Elise"
The "Köningstiger", the most feared tank from the Second World War. Weighing a staggering 68,5 tonnes with armored plates of 180mm thick and a 88mm gun, it would dominate the battlefield of armored vehicles until the end of the war.
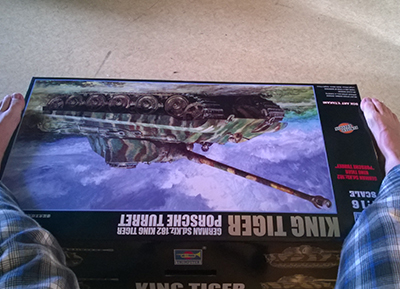
While shopping for items related to my BK-117 project, I came across this massive kit; A limited edition of the King Tiger with a Porsche Turret. Some quick research revealed that only 800 wre made of this kit and coming with both a clear and plastic version, I simply couldn't resist letting this one go. It will be the biggest model I have ever build, being 550mm long and almost 200mm wide (excluding the gun).
Let's get started!
Model Info
Scale: 1/16
Manufacturer: Trumpeter
Status: Completed
Date Started: July 12, 2015
Date Finished: April 10, 2018
The Making of
Photoshoot
Photoshoot
Posted on January 22, 2019 by Niek Nijsen
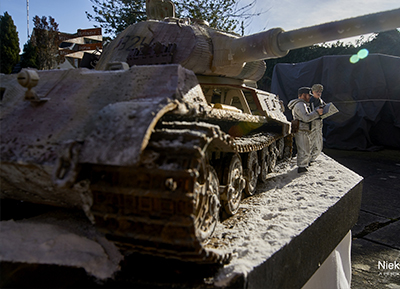
Way overdue, I finally present you the completed model, this time with a finished base for it, including name plaque. Have a look at the photoshoot series, and let me know what you think!
Thank you so much for sticking with me all the way to the finish. As always, on to the next one!
More Photos
The Final Push
Posted on April 12, 2018 by Niek Nijsen
Finally, after almost 3 years of work, I can call the King Tiger project complete. Despite all the delays and promises of regular updates, we’ve reached the finish line. And boy has it been a trip worth wile. And so, without further ado, I introduce to you the second last entry to this blog.
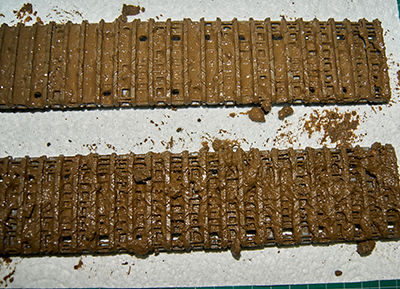
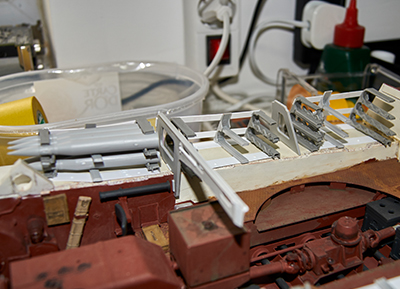
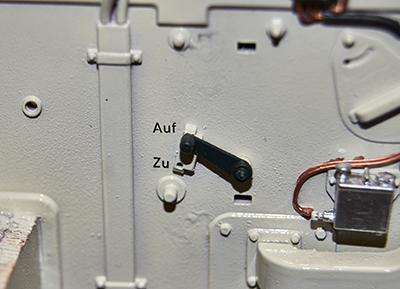
The next big step, which turned out to also be a very messy one, were the massive tracks for this monster. Measuring almost 90 cm (3 feet) in length, they had to be covered in mud before being able to add them to the model itself. For this I went into the garden and collected dirt, small twigs, leaves and some grass. All this was then mixed with PVA glue, water, and some pigments, before literally being dumped onto the tracks. I used a big brush to dab it on, making sure it would get into all the small openings and track links like it would do in real life. Once the first side was dry, a process I sped up using a hair dryer, the other side received the same treatment. After letting them dry for a good time, I wrapped them around the wheels, not realizing the glue made it a lot harder to bend them. As a result, some of the mud cracked and came off, which I re-added with some glue afterwards. The bits of the track that weren’t covered with mud received some weathering using metal paints to make the tracks look less plastic and more metal.
Read more
The end is in sight
Posted on January 02, 2018 by Niek Nijsen
What better way to start the new year than with an update on the King Tiger project? It’s been almost 3 months since the last update and a lot has happened since. A brief overview:
- Tools, cables, and side skirts have been added
- Brass gun muzzle has been added
- Gun mount received a zimmerit coat
- AA gun mount was assembled
- Handles were added to the air filters
- Over 100 ml of paint was sprayed
- Weathering
- Mud
- Painting of cut edges
- Adding of (small) details
Read more
A major milestone
Posted on October 24, 2017 by Niek Nijsen
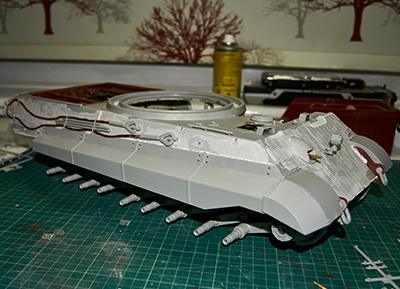
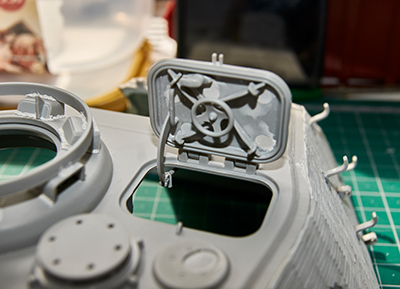
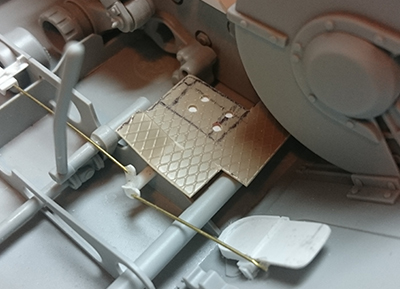
Finally, after more than 2 years building this model, I’ve finished the interior and closed up the hull and turret. But let’s go back somewhat to the part where I get all the subassemblies ready.
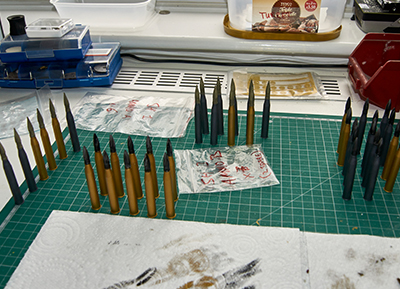
It all began with the tedious and somewhat boring task of sanding all the ammo shells. It took me around 2 hours to get all 40 of them looking smooth. While reading up on the rounds used in the King Tiger, I found out that towards the end of the war, the brass shells were going out of fashion (more likely because of brass becoming a scarce material) and treated steel was used instead. But figuring they would have had at least a few old ones laying around, I went with a combination of the 2 for my load-out. To paint the shell casings, I used Mr. Metal Color brass & iron, which were then buffed to give a metallic look. The scratches were actually created (more by accident) during the handling and placing them in the racks. As they turned out very realistic, I left them this way. The actual shell was painted using acrylics, simply because I used a brush for all of it instead of the airbrush. The colours used were black and olive drab by LifeColor. The white tip was created by dipping them in the lid of the bottle with some paint in it.
Read more
Finally, Assembly
Posted on October 06, 2017 by Niek Nijsen
Damn, it’s a good thing I wasn’t in charge of construction during the war, nothing would get done… Despite being back full-time working on the King Tiger, something has changed in my personal life which has taken priority. Planning a wedding. But despite that, I’m still making progress and I’ve got another big update to tell you all about it. As mentioned in the previous update, most of the parts were ready for paint by now, all I had to put together were a few small items and the remaining ammo-racks.
Like with the first racks I build, the resin parts for the rest of them were also warped. By using a few shells, I was able to “force” the parts into shape before gluing them onto the styrene strips. The bolts were then punched from styrene and added in the correct places. In order to make them fit flush with the lower hull, I had to sand some of the weld details, but they won’t be seen anymore once the racks are in position.
Read more
For the war effort
Posted on July 27, 2017 by Niek Nijsen
With the Spitfire finally finished, I’m back full time working on the King Tiger. And the progress has been huge, so much that a lot of the parts are ready for painting when I come back from work in 2 weeks. But we’ll get to that later in the update, let’s start with a quick overview of what’s new since April:
- Turret hatches, both Gunner & rear loading hatch
- Zimmerit coat added & damage applied
- Details in turret – wiring, nuts & bolts, ammo racks and many other bits
- First set of ammo shells for turret cleaned and assembled
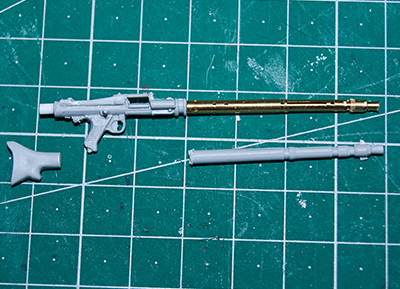
- MG gun for radio-operator
- Exhaust & armour blocks
- Main gun details – wiring, MG gun, welds and range-finder
- Hull roof – Wiring, ring details & vent cover
- Ammo racks
Read more
A real update?!
Posted on April 28, 2017 by Niek Nijsen
Before I start writing to you about the latest on this build, I owe you a big apology for the enormous gap in updates. As you may know, I have moved house a few months ago and had to rebuild my modelling cave from scratch. This resulted in preventing me from doing any work on my models and caused a big delay in the overall progress. However, the new cave is finally complete and I am ready to get back to work on the King Tiger. For those interested in my new (and old) model cave, have a look at the special page I’ve created for it. It has photos of all my model caves, starting in the USA all the way up to the latest one in the new house.
Read more
Many Parts Become One
Posted on September 21, 2016 by Niek Nijsen
Updates on a regular basis…. Yeah right.
I did manage to get a lot of work done actually, but there’s not much to show for it. Why’s that you might think? Well, it’s because I put together roughly 50-60 small parts to form one bigger part. Most of the work went into weathering all these parts and getting them ready for assembly. Once dry I glued them into place, which eventually led to a completed turret basket. I think the best option would be to have the photos speak for themselves, which can be found in the gallery as usual.
Read more

The Upper Office
Posted on July 16, 2016 by Niek Nijsen
I’m still alive… Although it’s been so quiet on this blog you might think otherwise. Having focused primarily on finishing the F-16 before the deadline, the King Tiger has progressed very slowly. Over the last couple of months (though mostly during the last few weeks) I’ve managed to do the following:
- Add welds to the turret
- Filling gun with lead
- Finished driver's seat
- First sheet of zimmerit
- Started on the turret basket
- Painted various parts of the basket
- Build a stand for turret
Read more
Assembly And More Paint
Posted on March 23, 2016 by Niek Nijsen
A lot has happened during the past month and the Tiger is slowly coming together. But still far from finished. Since the last update I’ve done the following:
- Added decals to the firewall
- Weathering of the front hull section
- Assembling parts in front of the hull
- Enhanced the hot air extractor tube for the gearbox
- Radio-operator seat and area enhanced
- Painted the first few MG ammo pouches
- Constructed, painted and fitted the gyrocompass
- Power unit for the compass build, painted and fitted
- Adjusted the tracks to get the correct slack
- Lots of work on the turret (rear hatch, commander’s hatch, and zimmerit)
- A lot of welds have been added to various parts
- Redesigned the cut-out section of the turret
Read more
Paint, Lots Of It
Posted on February 28, 2016 by Niek Nijsen
With so much work going into the F-16 project to get it finished in time, the King Tiger has been going a bit slow. But despite that, I think I’ve made some decent progress of the last couple of weeks. A short list of the things I’ve done:
- Adding the driver’s floorboard
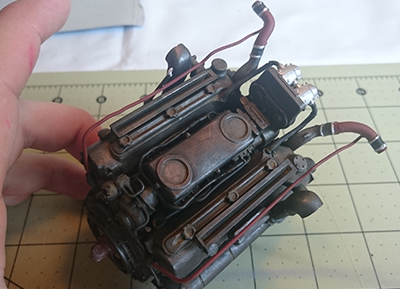
- Weathering the engine bay and fitting the engine
- Working on the new fan boxes and firewall
- Adding gallons of paint
- Detail painting
Read more
Big Model, Big Update
Posted on December 08, 2015 by Niek Nijsen
It’s been a while since my last update on the King Tiger project, mainly because I’ve been building the F-16, which took longer than anticipated. Despite the slight setback, we’re back in business now! And there’s a long list of things I’ve done to follow.
The engine was the first thing I continued working on. I’ve added the exhaust, carburettors and a lot of scratch build piping. The last was done because it would enhance the detail and reality of the whole engine, but also because quite a few plastic pipes broke during clean up. To prevent myself from spending too many hours on this, I decided to only add detail to the parts you can actually see. That means the piping is added to the top but not the bottom parts, and the same will be done with painting and weathering later on. Once the engine itself was put together, I finished the fans that go on top and put together a few other items that will be part of the engine assembly later on. Before painting, I wanted to be sure it still fits, so after a lot of wiggling and gently forcing it in place, the engine fitted in the space between the firewalls. Next up was painting the engine and its components.
Read more
Birth Of The Mighty Beast
Posted on August 06, 2015 by Niek Nijsen
It may have taken a while, but the birth of the mighty beast has finally happened. A first in many ways; it’s my biggest project to date, and the first project to be filmed in a time-lapse. A huge undertaking that will take me a lot of time to complete. Let’s begin!
The first thing to do was to unpack the massive box it came in. I’ve never seen so many sprues come for a single box. Is all of it supposed to fit inside this model?! Once I’ve cut open all the bags I labeled each sprue with tape and the letter on it to ease in the organizing of parts. A very handy trick I picked up online. Once everything was opened and labeled I put them back in the box, ironically enough. I simply don’t have the space to have them all lay around on my desk, so they’re in a box underneath the table where I can easily access them when needed.
Read more
Bigger And Bigger
Posted on May 28, 2014 by Niek Nijsen
Not being able to resist a limited edition like this, I started doing some research and quickly discovered that this would be a great model to build as a semi see-through. Combining both the clear and plastic versions should allow me to build a very accurate interior which can be seen by everyone, while still being able to add details to the outside of the tank. I will go for a winter version of the tank, based on the famous "Annelise" from the 503rd SS.Pz.Abt.
Read more
Niek Nijsen Ltd.
Comp. Reg. (UK): 13778584
VAT. Reg. (UK): 398 4757 24
info@nieknijsen.com
Copyright
Niek Nijsen Ltd. © 2008 -
All Rights Reserved
Privacy Policy | Terms of Business