
Paint, Lots Of It
Posted on February 28, 2016 by Niek Nijsen
With so much work going into the F-16 project to get it finished in time, the King Tiger has been going a bit slow. But despite that, I think I’ve made some decent progress of the last couple of weeks. A short list of the things I’ve done:
- Adding the driver’s floorboard
- Weathering the engine bay and fitting the engine
- Working on the new fan boxes and firewall
- Adding gallons of paint
- Detail painting
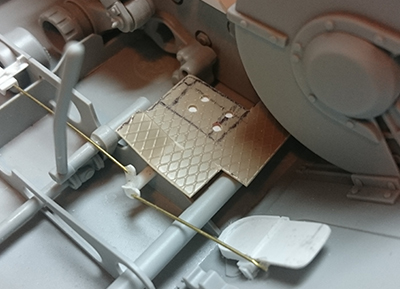
A vital part from the driver’s side is the floorboard for his feet to rest on, but this is missing from the model. Based on photos I made this from scratch. I purchased a few sheets of styrene with a tread plate pattern to match the rest of the vehicle. Firstly I made a template from paper before cutting it from styrene. By gently heating it, I was able to bend it to shape to fit over the wheel axels and framework. This was then glued on top of a piece of styrene tube to get the correct height. The only thing left to do is add 4 bolts, made from thin styrene sheet with a punch set. Once that’s done I’ll be able to paint and add it to the model.
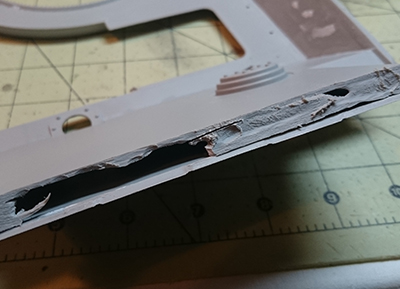
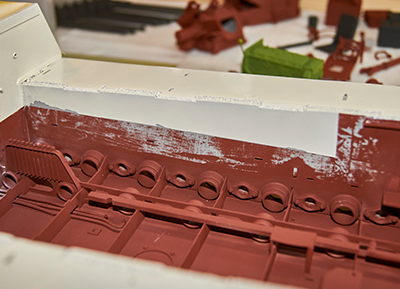
Before I would paint the lower bit, I needed to sort the top half out, as it didn’t fit nicely at all. Since I’ve added the extra padding on the sides to match the real armour thickness, the seam between the sides and top half showed a massive gap. So it was back to square one and remove the extra padding. This wasn’t as easy as I hoped, as it was glued down with extra thin and bonded extremely well. After a lot of cutting with a knife and cursing, let alone almost cutting my finger a few millimeters shorter, I managed to remove both sides without too much damage to the upper hull. Now that this was gone, the sides fitted a lot better already, but still leaving a gap. This was the result of a poor fit at the front of the part, where it would slide into the lower half. I started by sanding down this bit, but took me way too long. I decided to apply some more force and out came the Dremel. After some serious grinding the parts fitted nicely. A quick swipe with a sanding stick to make it look somewhat decent and I was happy. That’s the fit between the lower and upper hull sorted. Eventually I’ll add a thin sheet of plastic underneath the sides to make it all smooth and straight, but that will come later.
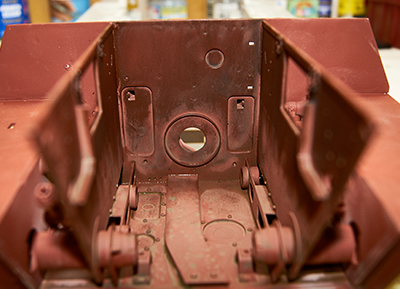
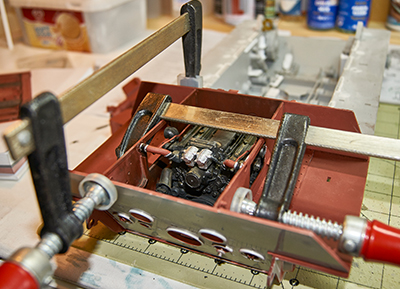
Now that the fit was sorted, I needed to decide whether to paint the front half, or fit the engine first to allow me to fit the rear wall. This would then allow me to bend the sides straight before painting, which would probably result in extra surface tension and paint cracking. So I decided to fit the engine first. This meant that I would have to weather the engine bay first. I used the Flory wash ‘dark dirt’ and generously applied it to the firewalls. Once dry I used kitchen towel and cotton buds to tone it down until I achieved the desired look. I then followed with pigment and added rust, black, and brown to break the red and recreate some oil leaks and such. Having never used the wash before, I was quite happy with the result. It’s a good area to practice, since most of it will be hidden from sight anyway. With the weathering done it was time to fit the engine. With an average of 10 head-scratches and curse words per minute, I finally was able to “force” the engine in place. I finally understood why people were saying it is a poor and difficult fit to get it in place. Damn…. I think after about 20 minutes the engine was in and I could glue it in place. The poor fit resulted in bending of the firewalls, which were forced back to their correct position with heavy tools and clamps. I made sure that everything was still reachable before gluing the rear wall in place. A lot of glue and bending of the lower hull was required to get a nice fit, but eventually I succeeded. In hindsight I should have used a mask, as the glue fumes got to my head a bit. Think I finally understand what it feels like to be high.
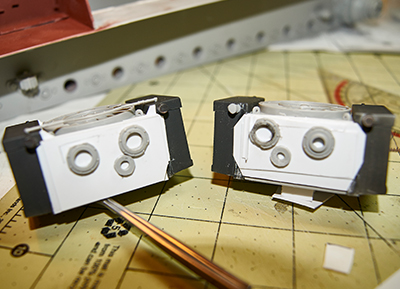
Up next was reshaping the cooling fans, as they’ll be visible in the final model. First I drilled holes in the lips attached to the top of the fan, which were hooks to allow removal of the boxes. With the holes now drilled, I sanded the part down to match the size of the filters which are fitted to the sides. Using photos a reference, I cut styrene sheets to size and glued them to fans to form a box. Having kept the original firewall hose fittings in my spare parts box, I was able to salvage the connector fittings and added them to the fan boxes. With a large amount of time spent of the first box, I opted to enhance the right side only slightly to the areas that will be seen. I’ll leave the right side covered, so the only bit you can see is through the engine bay and firewall. I glued a short foot to the bottom of the box to achieve the correct height and added the hose connectors to the newly formed box.
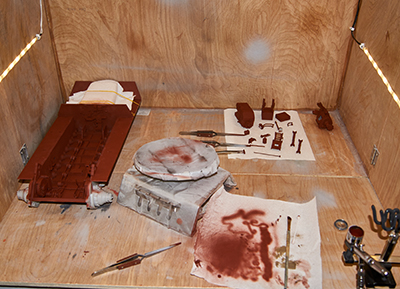
With all this work done to the rear section, it was nice to finally get the paint down. I started off with a new type of primer which I’d never used before (stupid, stupid, stupid). No problems with putting it down. Next was the first layer of paint, the hull red primer colour. Again, no problems putting it down and the airbrush did a great job. At this point I ran into a problem, as I didn’t have the correct colour for the top half. The early King Tigers had an ivory white paint applied to the top half, which included all vehicles with a Porsche turret. I didn’t have this colour, so back to the shopping site to order some. The only paint I could find that matched what I was looking for came in gloss, which is okay, but not perfect. Anyway, I went for it and bought a jar. The gloss is easily overcome with a coat of matt varnish later on. The new paint arrived a couple of days later and I was eager to get going with it. As easy the red colour went on, as difficult this one was. It eventually took me 4 coats of this stuff in order to get a nice solid finish. So far so good, right. The time came to remove the masking tape and see what the red and ivory combination looked like. Disaster…! It turns out that my new primer doesn’t like enamel pains. As soon as I removed the tape, most of the red paint came with it! An absolute nightmare! After counting to 10 (or perhaps a bit further), I tossed the primer in the bin, rubbish stuff. Next up was coming up with an idea to restore the damage. Part of the ivory paint had come off as well, since it was sprayed on top of the primer red. I decided to use a brush and reapply the red primer colour, even where it removed the ivory paint. I figured a bit of paint damage and wear seems possible, especially in the fighting compartment where empty shell casings would bounce around and a lot of movement takes place during shooting. With a brush I applied the paint in a dabbing motion, trying to blend it in with the still remaining paint. I think it turned out pretty well actually, and in hindsight I’m pretty pleased with what happened. Perhaps not as it should have been, but a bit of personal artistic creativity is never wrong, right? After all, it’s my model.
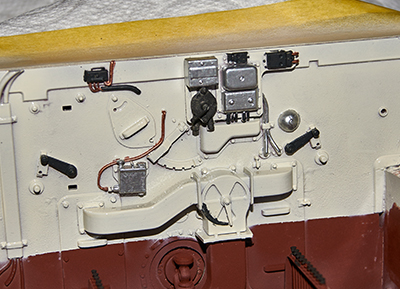
I also painted most of the parts that belong in the front of the hull, such as the gearbox and oil reservoir. Before I’m able to fit these to the model, I’ll have to glue the wheel axels in place, which were painted as well in anthracite black. I’ve detail painted them with a small brush using various paints before giving them a wash (combination of grime and dark dirt). I picked up a very handy tip a while ago, and added scratches using a pencil. A lot easier to use and control than a brush. With all the details added these parts are now ready to be fitted to the model. Last but not least a lot of effort went into painting the items mounted on the rear firewall.
The next step will be to add a few decals to the firewall and spray the lower hull with a matt varnish in order to get rid of the glossy look of the ivory paint. Once that’s done I’ll fit all the parts and hopefully be able to add details like wiring and weathering to it. But that’s something for the next update.
Hope you’re enjoying the build and new photos. I’ve also edited and uploaded the second part of the time-lapse videos, which can be found on my YouTube channel, found here. (I’ve got some problems uploading it to my website, hopefully I’ll have this sorted shortly). Until next time!
Return to Previous Page
Niek Nijsen Ltd.
Comp. Reg. (UK): 13778584
VAT. Reg. (UK): 398 4757 24
info@nieknijsen.com
Copyright
Niek Nijsen Ltd. © 2008 -
All Rights Reserved
Privacy Policy | Terms of Business