
The End Is In Sight
Posted on January 02, 2018 by Niek Nijsen
What better way to start the new year than with an update on the King Tiger project? It’s been almost 3 months since the last update and a lot has happened since. A brief overview:
- Tools, cables, and side skirts have been added
- Brass gun muzzle has been added
- Gun mount received a zimmerit coat
- AA gun mount was assembled
- Handles were added to the air filters
- Over 100 ml of paint was sprayed
- Weathering
- Mud
- Painting of cut edges
- Adding of (small) details
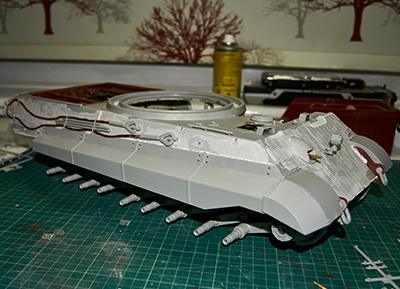
In the previous blog update, I mentioned that the model was almost ready for paint. Before I could start spraying layer after layer, I needed to add various clasps, tools, and cables that are mounted to the side and top of the tank. The tools were cut from the sprue and cleaned up before being glued into place. The axe was added next to the radio-operator’s hatch, and the cable-cutter was mounted to the left engine cover. The cables consist of brass wire and plastic end-bits. These were glued together using CA glue, although I had to cut some strands to make the brass cable fit in the (too) small hole in the plastic bits. After some fiddling, it all fitted and they were mounted to the right-side of the tank. The only problem that I had when doing this resulted from adding the additional layer of zimmerit, thus leaving the gap between the hull and clasps too small to fit the cable. Instead, I glued the cable in place and filled the holes for the clasps, before gluing them on top of said gaps.
Next up was the headlight, which sits in the middle of the front of the tank. Again, the zimmerit coat turned out to be a small hindrance, but with a little modification and a good amount of glue, I was able to get it to sit correctly. The wire was cut to size and glued in place.
After the headlight, I started adding the side skirts. To make the model more interesting, I cut off parts of the skirts, as if they’d been damaged during battle and removed by the crew. A lot of the Tiger Tanks show this in photos, so why not add it to my model? The right side has the last 2 skirts missing, as well as the rear cover. The left side is missing the front half and part of the front cover. That way it breaks it up quite nicely, plus it works out with the opening of the hull I made on the left side (which is actually based on the skirt size and location).
Because I cut the left-side open, some items had to be cut in half, or completely left off in order to still show the interior. I opted to leave the towing cable off completely, and another tool was cut in half. The missing cable resulted in me having to made one of the clasps from PE (part of the upgrade set) as the original plastic version was moulded as part of the cleaning rods. Although it went together pretty easy, the top strip needed to be bend into shape to fit the cable and rods. This turned out to be more difficult than expected, and I eventually decided to fill up the PE part with putty and sand the required shape afterwards
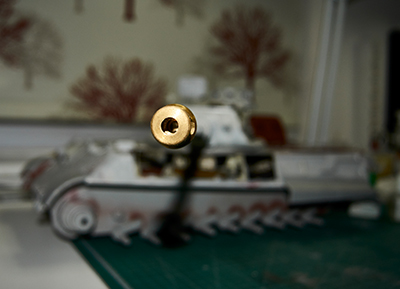
One of the first upgrades I got for this kit was the brass gun muzzle from Aber. A stunningly beautiful piece of engineering. Getting it all together and making it fit to the end of my barrel was a small project in itself, as it consisted of almost 10 parts. I tried my new torch to solder bits together, but found this didn’t really work with the aluminium barrel, so although the muzzle itself is soldered, its attached to the barrel with CA glue. The result, breath-taking.
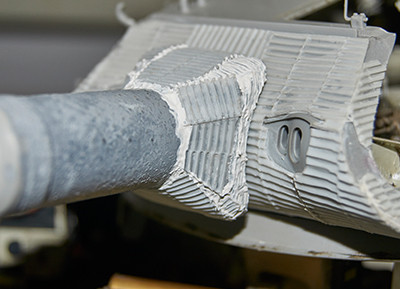
Early on I opted to add zimmerit to this model, but when I got the set I didn’t realize that it came with a newly moulded gun mount. Sadly, I’d already used the required kit parts in the original mount, so I was forced to create the zimmerit from scratch. I used parts of the sheet that were left over from the side (due to the cut-out of the hull) and the gaps were filled with putty. Using a cocktail stick I tried to create the iconic wavy lines. The curvature of the part didn’t make this an easy job at all, but overall, I’m happy with how it turned out and I think the difference in appearance adds a little to the battle damage as well.
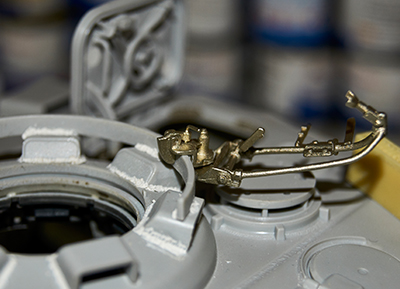
Although not a very common item on the King Tiger towards the end of the war, I figured that the addition of an anti-air gun would give the viewer another area of interest. I bought the AA mount made by Shumo Kits, which is made out of white-metal. Another small model in itself, that required a bit of sanding and drilling to remove the casting blocks and open the mounting holes. The top-end, on which the gun-barrel sits, is still movable, allowing me to change the final position once the gun is in place. A strip of styrene was added to the clamp that mounts the whole thing onto the commander’s turret ring, as this was too big. Other than that, it required no modifications.
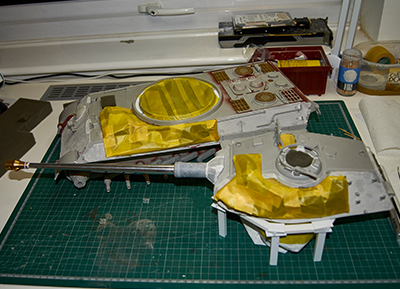
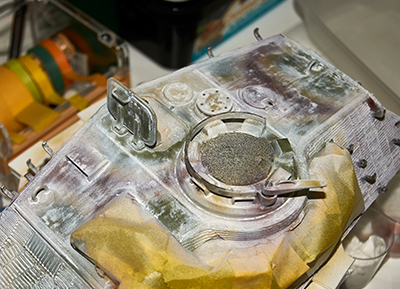
By now we’d arrived at the favourite stage of each modeller; Masking. Normally not a big issue, but because I’d cut away large parts of the hull and turret, I had to somehow come up with a way to prevent paint from leaking into the tank. I achieved this by sticking a piece of 10mm Tamiya masking tape onto the edge of the open areas, making sure half of it was still sticking out. I then used the 40mm tape to close the gap, sticking this to the 10mm strips of tape that stuck out. Think of it as the letter C, with the top and bottom end stuck to the cutting edge of the model. Make sense? I know, a complicated explanation, but hopefully the photos make it clear. The hatch openings were filled with foam blocks and further masking tape. The turret was done in the similar fashion, although the basket was covered using kitchen towel, stuck to the bottom with Tamiya tape.
From the massive list of “things to do”, I noticed that the handles on air filters hadn’t been done yet. Looking through my rather large stash of spare parts, I found some handles from the 1/32 Apache kit my brother once build when he was little. They worked absolutely perfect for my purpose and saved me a lot of time, as I would have had to make them from metal/copper wire bended to shape. The handles were glued into place, with 3 of them lying flat and one standing up. Again, a little variation adds to the interest of the viewer.
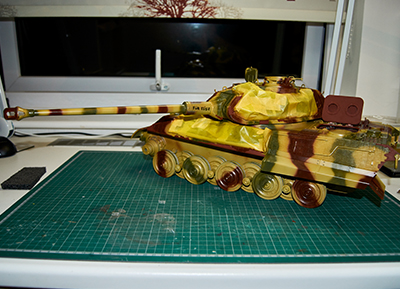
I know, you’re still waiting on the part where I tell you all about the gallons of paint this model required to look like the real thing. Well today is your lucky day, as here it is. I normally spray my models with Mr. Surfacer 1200 as a primer, but with a model this big, that would cost me too much in paint. Instead, I sprayed all non-plastic parts, including a thin layer on the resin sheets, to give the paint extra “bite” to the model. The base coat is ‘Dark Yellow, RAL7028’ (MRP-037), which covers the whole model. I ended up using almost 1.5 bottles (45ml) to get the job done. I followed with the camouflage colours, ‘Olive Green, RAL6003’ (MRP-035) and ‘Red Brown, RAL8017’ (MRP-036). These were sprayed in a pattern loosely based on photos of the actual model, and a bit of my own artistic license. Perhaps not entirely historically accurate, but I think it looks good and realistic. After all, my model is a non-existent tank, based loosely on “Anneliese” of the S.P.Abt. 503. The camouflage was applied with the turret in place, as this would be the case in real life, too, in order to end up with a matching pattern. It also makes it easier to leave the area underneath the turret unpainted. Next up where the wheels, which were painted in a similar fashion. Regarding camouflage, I sprayed half of them with green and the other half with the brown, making sure they’d appear in a random fashion as if they’ve been turning since having been painted. Lastly, I painted all the small parts that will be mounted once the painting stage has been completed. And there you have it, that’s the tank in her summer dress.
For those of you with very good eyes, you might notice that I forgot the place the tow cable on the left side before painting the camouflage, which would have resulted in the typical “yellow shadow” on the side. Let’s just assume the cable has been missing for a long time and camouflage has been redone since. Also, I ended up turning the commander’s hatch 180 degrees, resulting in the camouflage being the wrong way around. I didn’t realise this until it was glued in place, but I don’t think it’s too big a mistake to try and correct at this stage.
Time for some detailed work. My model has quite some damage to the zimmerit coating, and would reveal the hull red primer underneath. I painted all the areas in the correct colour, giving me a subtle difference between the brown camouflage colour. Some of them will stand out more later on once the winter camouflage has been applied, as some of the coat will have been damaged after this was applied.
It is also at this stage that I finally got to name my tank. A small background story; As I mentioned before, my model is loosely based on “Anneliese”. After watching the movie “Fury”, I tried to find something similar by combining the names. I came up with the name “Für Elise”, naming her after the famous piano piece written by Ludwig von Beethoven, one of my favourite piano plays and composers. Using a thin brush and black paint, I wrote the name on the barrel free-hand, followed by the numbers “324” on the side and rear-hatch (combination of my lucky numbers 3 & 24).
Areas of heavy wear and tear caused by the crew climbing onto the tank and things scraping along the skirts (such as trees) were recreated by using the “Red Hull Primer” colour and dry-brushing metallic paint onto hooks, edges, and flat spots.
This stage was completed by adding the wheels, trying to match them with the main camouflage and also fit them evenly on both sides. I strongly believe the wheels would have been painted separately if camouflage was newly applied or touched-up in the field, so a perfect match would never be the case.
I’ve always wanted to do a winter camouflage, but do it in such a way that it wouldn’t ruin all the work that I’d put in so far. After seeing many photos of tanks during the war operating in snowy conditions, I noticed that a lot of their winter camos had washed off. This was mainly the result of the wash being a water-based paint, therefore not lasting very long in the field. I did a trial with using white paint and the white clay wash by Flory Models. Eventually, I decided to use a combination of the two, applying the main coat using actual paint and finer details and weathering using the wash.
The white paint (MRP-004) was sprayed on very thinly and in a random pattern, in an attempt to start the weathering and fading of the winter camouflage. Before coming in with the clay wash, I used the previously mentioned camouflage colours to touch-up various areas that I thought were done too strongly. The clay wash was applied using the airbrush, again heavier in areas where it would most likely stick better than on the flat surfaces, such as the skirts. Multiple layers were applied, slowly building it up.
The combination of the two types of paint allowed me better control of the weathering process. Since the paint was lacquer based, it would only come off using sanders. The clay wash could easily be removed with a damp brush or paper towel. Using both techniques, I gave it a more heavily worn look to the flat surfaces, while the zimmerit was almost left completely alone, since the elements would have had a harder time trying to remove it from all the ridges in the coat. Areas where crew would climb on to get inside received strong weathering as well. Areas where the red primer was showing through were enhanced where necessary and sometimes even brought back all together, as if the damage was done after the winter camouflage had been applied. I finished this stage by covering the whole model in a layer or matt varnish, MRP-127 to seal it all in.
Up to this point I’d left the metal wheels alone, as I didn’t have the correct primer. I bought myself a can of Mr. Metal Primer and sprayed the wheels before coming in with the Dark Yellow and camouflage colours. Lastly, I applied the white camouflage using the lacquer paint. Most of this will be hidden by mud and snow in the final model anyway, so I wasn’t too fussed about getting the patters and weathering correct.
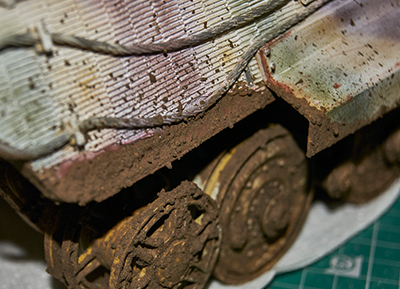
It was now time for the dirty job, the application of mud. As I’d never done this before, I spend the next few hours on the web, watching various videos and reading articles about how to create a realistic mud effect. In the end, I chose to go with the combination of dirt from the garden, mixed with water and hobby glue. I kept thinning the mix with water until it was almost like a milkshake consistency. Using a large brush, I applied the mixture in a dabbing motion onto the model. This technique allowed for easy control, as well as varying the thickness of it in certain areas as I went along. I completed this process by flicking mud onto the model to create spatters. This was done by striking the brush along a wooden stick, thus flicking the mud off the brush with each pass of the bristles on the stick. I’ll have to repeat the last technique again to the back end, as I forgot to put the exhaust guards in place. They stand out quite a bit at the moment without any mud on them.
Now I could finally remove the masking tape and see how much of the paint had managed to get inside the model. Surprisingly little, it turned out. To be honest, I’m quite proud of my masking skills on this one, I expected a lot more clean-up to be required. With the masking tape removed, I could finally paint the edges, which were still showing in bare plastic. I wanted a colour that wasn’t too bright and “in-your-face”, but it also needed to show the viewer that something was missing here. I ended up going for the red hull primer, as this would bring everything nicely together. Using a brush, I hand-painted all the edges, striking the brush from the inside towards the outside. This way, any brush strokes would look like torch cut marks, or at least that’s the idea. A single coat covered most of the edges the first time, although I think I might have to do a few areas again, just to give it a slightly more solid look.
A few details were still left to be done. I figured the muzzle would have quite a bit of black residue on it from all the expelling smoke and gasses when a round is fired. Using black pigment, I added this residue, trying to work in a logic pattern that the expelling gasses would create. The inside of the muzzle was painted black.
Pull cables attached to the hatches on the turret were added, of which the handles were made of brass rod bend to shape. The air filters were painted, covered in a grime wash and weathered to match that of the engine bay. These will later be added in the diorama. The exhausts were given a base colour using the red camouflage paint. I will use pigments and rust colours next time to create a rusty effect to them.
And that brings us to the end of this update, only a few steps away from completion. I hope you enjoyed it so far. Next time I’ll be finishing the weathering using oils, and I’ll be working on the tracks and figures, before starting on the diorama base. So, stay tuned and please let me know what you think. See you next time!
Return to Previous Page
Niek Nijsen Ltd.
Comp. Reg. (UK): 13778584
VAT. Reg. (UK): 398 4757 24
info@nieknijsen.com
Copyright
Niek Nijsen Ltd. © 2008 -
All Rights Reserved
Privacy Policy | Terms of Business