
For The War Effort
Posted on July 27, 2017 by Niek Nijsen
With the Spitfire finally finished, I’m back full time working on the King Tiger. And the progress has been huge, so much that a lot of the parts are ready for painting when I come back from work in 2 weeks. But we’ll get to that later in the update, let’s start with a quick overview of what’s new since April:
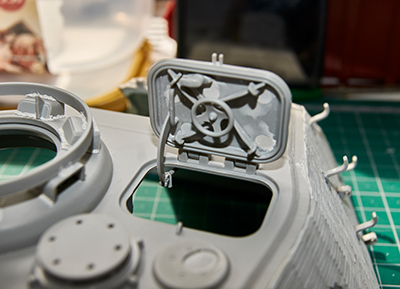
- Turret hatches, both Gunner & rear loading hatch
- Zimmerit coat added & damage applied
- Details in turret – wiring, nuts & bolts, ammo racks and many other bits
- First set of ammo shells for turret cleaned and assembled
- MG gun for radio-operator
- Exhaust & armour blocks
- Main gun details – wiring, MG gun, welds and range-finder
- Hull roof – Wiring, ring details & vent cover
- Ammo racks
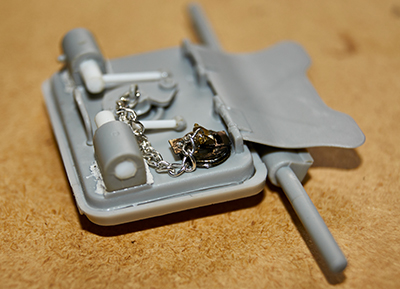
The project has been waiting on the shelves for quite some time, over half a year now. So, when I finally got back to it, I started with the hatches, as these were the first things in my hands. I recently bought myself the ABER upgrade set, which includes details for the rear hatch and a few other bits that go on the turret. I don’t think I’ll be using all of it, but taking the useful bits off it and combine them with the kit parts to achieve the best result. As you might recall from previous updates, I added a chain to the loading hatch (rear of the turret) but it looked so awful that I removed it again. Instead I bought a cheap necklace at a local shop and used the chain, which had the perfect size. The next problem was where to attach the other end to, as there’s nothing moulded on the kit parts. The Aber set provides something for this, but it comes in 6 separate bits and is very fiddly. Good thing I got my new tool, which is a Dremel torch and liquid soldering paste. But dumb me discovered that the torch came without gas (hint, always read the small print) and made it useless for the time being. So, I opted to use a standard lighter to heat up the paste to solder it all together. It took multiple attempts to get it done, but eventually I managed to put all the bits together and got it looking somewhat like the real thing. It was then glued to the hatch and the chain attached to it. This pretty much now completes the hatch, and the only thing left is the cord to pull it back up, but that will be added once it’s glued into position onto the turret. The gunner’s hatch was already put together but still needed the piston to be added on the inside of the turret, which keeps the hatch in the open position.
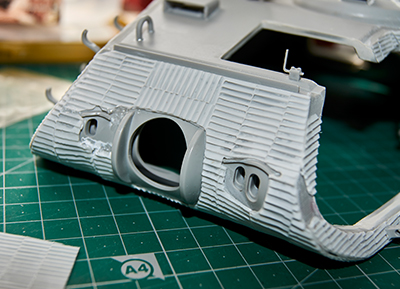
Over time it seemed the glue hadn’t really done its job and the zimmerit sheets I’d previously glued on started to come off. Determined to make sure this wouldn’t happen again, I put everything back on with CA glue this time, using generous amounts all around. This seems to have done the job a lot better, and there’s no way it’ll be coming off again. The sheets were added all over the turret and gaps were subsequently filled with perfect plastic putty. I must admit, this stuff is a lot easier to use than the normal putty I use, mainly because of the thin tip, which allows for precision application. The only downside of using pre-shaped zimmerit sheets is that it’s all perfectly shaped. But let’s be honest, we’re building a tank here, one that was well used during the later stages of the war, so of course there should be damage to the coat. So, out came the hobby knife and I started chopping and cutting my way around, trying to achieve a realistic look while keeping the overall appearance in the back of my head. Not an easy task, as this model is so big it’s easy to get carried away. I still want to go back and do a bit of final detailing using the Dremel, but that will have to wait until I’m back. With all the above done, I glued the external details in place. These included the hooks for spare tracks, aiming sights and the gunner’s hatch.
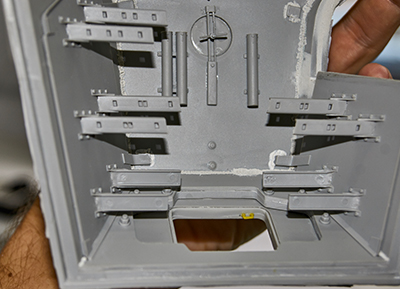
With the outside of the turret now mostly completed, I focused my attention to the inside. A lot of the parts had been put in previously, but there was still plenty left to do. I began by adding the remaining kit parts, which included the piston for the gunner’s hatch, the binocular stand and the wheel to open/close the commander’s hatch. I then punched some nuts from a plastic sheet and added these to the parts that needed it. With all the plastic bits in place, I began looking at photos and tried to find a way to add all the wiring and where it had to go. Now the problem is that I’m building the Porsche version, of which there aren’t many photos. The amazing build by David Parker provides a lot of guidance, but in this section, it’s not very helpful to me. Instead I tried to apply logics and routed the wires around the edges as much as possible. I’m sure I’ve missed a few, but I think the overall appearance is quite convincing. For the gunner to get out of the tank, he would have to pull himself up through the hatch. Unfortunately, the grab handles are missing from the kit and I had to make these from some wiring, which was glued in place and detailed with welds afterwards. Another thing that’s different between the Porsche and Henschel are the ammo rack in the turret. David spends a lot of time having to correct the kit parts for his build, but having had a long hard look at the few photos of the Porsche interior, it appears to me that Trumpeter got it right and provided the kit with the correct looking shelves. So, with a big smile on my face, I put them all together and glued them into place inside the turret. It’s starting to get very crowded in here and that’s even without the ammo shells in there… Before I left this bit of the tank to rest, I added more wiring to the base of the turret, which will be connected to the basked once attached. These were made of brass- and lead wire, all varying in thickness. Connectors and locking hooks were made using putty. Finally, was the addition of a few boxes to the side of the turret, which held equipment for the MG gun and the gunner’s headset when not in use.
Let’s be honest, a tank was designed to shoot things and how is it going to achieve this without any ammo? Exactly, time to polish up some of those massive rounds and get them ready for paint. When the model will be finished, I plan to have it loaded with roughly 40 shells. That’s a lot of sanding as each one of them is attached to the sprue by 4 tabs, let alone the massive seem line that runs along the full length on both sides. To avoid getting fed up with this tedious job, I’ve decided to do them in small batches. Only problem is that the turret will be receiving about 15 of them, so it still took me a good hour or so to get them done. Once they were sanded smooth, I glued the PE to the bottom of each one. Once painted they’ll receive the decals and weathering before being placed in the racks.
One of the things that took a lot of my patience last time I worked on the model was the MG gun, which is fitted in the front of the hull. It’s not a great part straight from the kit and requires quite a lot of work to make it look realistic. I previously replaced the barrel with a brass turned version, which really looks the part. But there’s a lot more to do, especially on the framework that holds the ammo bags. None of this is included in the kit and must be made from scratch. Using styrene sheet, I constructed the rail and added the ammo bags. I then made the sides from plastic card as well, for the spent rounds to be collected in an empty pouch. A lot of work which took a long time and patience, but overall, I’m pleased with the result. It might not be a 100% exact, but I challenge you to show me where I’ve gone wrong. The remaining bits were added to the whole lot and the mini-model is now ready for paint. I suggest you have a look at the photos, as it’s difficult to describe all the work done to it.
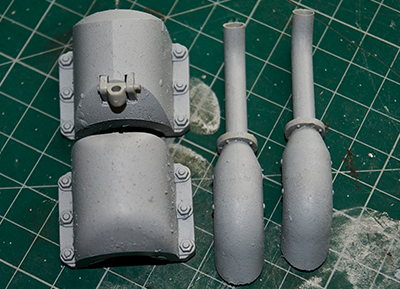
I had a strong need to work on something simple and big after the above, and shifted to the back of the tank. The zimmerit was added to the back plate and subsequent damage was applied to the sheet. A few small items were added before I began working on the big parts, namely the exhaust stack and armour blocks. The covers in the kit are supplied as a thing plastic shape, but in real life they were cast from a solid piece of steel. To achieve the correct look, I filled the inside with modelling clay and shaped it to fit the exhaust stack. After hardening for 24 hours I applied a coat of Mr. Surfacer to the outside using a brush in a dabbing motion. As the paint dries, which goes quickly as it’s a lacquer-based product, you get a nice looking cast-iron effect, much like the real thing. The same technique was applied to the exhaust, be it in a slightly subtler way to represent heat and rust effects later when we get to the painting stage.
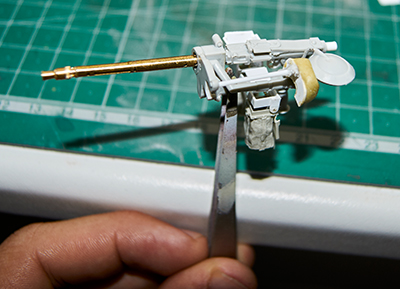
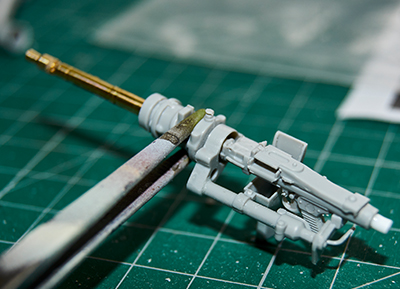
Eventually you run out of big parts and will have to move back to the smaller stuff. Although the gun is still a massive item in this model, it comprises of many smaller components, of which a lot needed some additional detailing. I began with the easy job by adding wiring to the gun. Using thick lead wire, I recreated the compressed air line, which is missing from the kit. This will later be connected to the basked, along with all the other wires from the turret. The next item on the list that really needed some work was the MG gun. Just as the one down in the front of the tank, this one received a new brass barrel from Aber. Luckily a lot of the kit parts were useable and looked a lot like the real thing. Once it was all put together, I removed the buttstock of the gun and replaced it with a styrene rod, as these would have been taken off to fit inside the tank. I shifted my attention to the other side of the gun, where you can find the range-finder used by the commander. I replaced the whole thing with a resin version created by David Parker (AFV) and adjusted various parts to fit the Porsche turret, as all his items are designed for the slightly larger Henschel turret. I achieved this by simply cutting off a corner of the supporting plate, which will hardly be visible in the end anyway. Once painted I’ll glue all the smaller subassemblies in place, but I’ve dry-fitted all of them to make sure it all aligns.
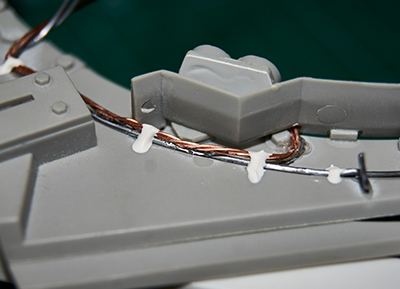
Back down to the lower section of the tank, where the hull roof required some additional work. I added the details to the ring around the turret basked, which would have been bolted to the hull roof. It is difficult to see how many the Porsche variant had, but I’ve gone with a logic layout, evenly spacing them out around the ring. I think it looks very good and with the basked mounted it’ll be a tough job to see them. Wiring was added as well along the edge of the roof. This runs from the radio set all the way down to the antenna, located at the back of the tank. I had to come up with an idea for the vent, which is located in the front between the driver and radio-operator hatches, as it was cut in half. In the end, I opted to close the piece with some plastic sheet, as if it was cut in half, too. It looks a bit odd maybe, but once the paint is on it’ll make more sense. The front of the vent was enhanced with a PE roster, taken from the U-Boat project.
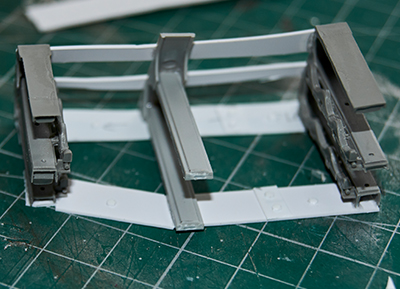
And so, we arrive at the most dreaded part of this update, the ammo racks. Sadly, most of the racks proved by AFV in resin have warped. So, they require quite a bit of work to make them fit. For this I’m using a few shells to force the resin into the correct position before gluing plastic strips to the bottom and rear of them, as they would have had in real life. Bolts are added to enhance the detail and kit parts are used for the middle support strut, as these are the same. Something that takes a lot of time but doesn’t have a lot to show for it. So far, I’ve only managed to do the front ones and the left rear, with still 3 more to be done. But like the shells, I’ll do them in between other jobs to keep myself motivated.
This must have easily been my biggest update in a while, but we have finally reached the end. If you’re still reading, I’m impressed, you must really be interested in this project. Thank you. With all the above, we’ve almost reached another time-lapse update, just 2 more hours to go. Next time we’ll be working on the remaining ammo racks and hopefully start to apply some paint to the beast. The lower hull will be enhanced with zimmerit and with a bit of luck we’ll be able to start merging the turret with the lower hull. Exiting times ahead!
Return to Previous Page

Niek Nijsen Ltd.
Comp. Reg. (UK): 13778584
VAT. Reg. (UK): 398 4757 24
info@nieknijsen.com
Copyright
Niek Nijsen Ltd. © 2008 -
All Rights Reserved
Privacy Policy | Terms of Business