
Birth Of The Mighty Beast
Posted on August 06, 2015 by Niek Nijsen
It may have taken a while, but the birth of the mighty beast has finally happened. A first in many ways; it’s my biggest project to date, and the first project to be filmed in a time-lapse. A huge undertaking that will take me a lot of time to complete. Let’s begin!
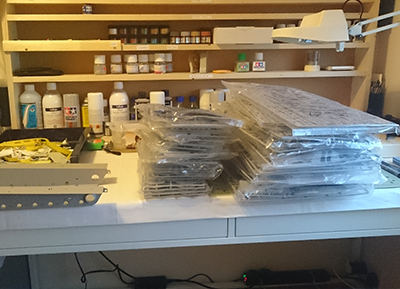
The first thing to do was to unpack the massive box it came in. I’ve never seen so many sprues come for a single box. Is all of it supposed to fit inside this model?! Once I’ve cut open all the bags I labeled each sprue with tape and the letter on it to ease in the organizing of parts. A very handy trick I picked up online. Once everything was opened and labeled I put them back in the box, ironically enough. I simply don’t have the space to have them all lay around on my desk, so they’re in a box underneath the table where I can easily access them when needed.
Work started on the lower hull, which was quickly modified by filling all the sink marks and sanding the parts that would receive detailing later on, such as the spare periscopes. The suspensions were added as well as the internal support structure, which will eventually be completely hidden from sight for the most part. I know this model will receive a lot of extra detailing and corrections to resemble the real thing, I’ll keep it to the things that are actually visible once finished. Otherwise there’s not ending to it and this project will take years to complete. Most of the detailing will be done to the gearbox assembly, driver- and radio operator area, engine, and turret.
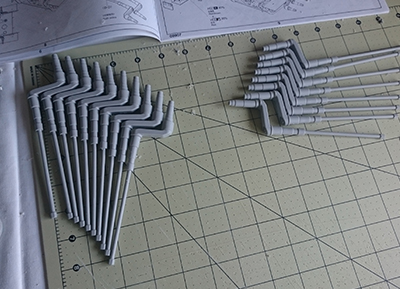
According to the manual, you’re supposed to start with assembling all the wheels. With 18 wheels, each made up of 4 parts, this was quite the thing to start this model with. I marked all the wheels and cut them from the sprue, but they’re all in a box at the moment, as they’ll be finished later on when they’re needed. Although I might do a few wheels at a time to spread the boring work over a period. We’ll see how things work out.
The drive axels were next, the same amount of work, although only consisting of 3 parts this time. Due to the molding process, each piece came with a nice ridge on both sides where the molds came together during production. I scraped all of them off and assembled the pieces together. These will be painted black later on before being fitted to the model.
Up next was the gearbox assembly and steering housing. Not a bad fit at all, looks a lot like the real machine. But after a closer look and comparing it with reference material, I decided this needed work as well. I assembled most of the parts to see where it needed the most of work and whether it would actually be visible once completed. The gearbox used to be made of cast iron, so I managed to get the same look by mixing Mr. Surfacer (a primer type of paint) with the dust of sanded sprues. This was then applied to the parts, resulting in a rough finish, much like cast iron. Although I’m pretty happy with the result, I’ll probably give it another layer before painting to enhance the effect.
The gearbox housing needed the most work. So far I’ve cut parts out, added a strip which was used to keep it all together and fitted some of the levers. Still a lot to do, such as a gearlever, nuts and bolts, hooks for hoisting, and a few other bits and pieces.
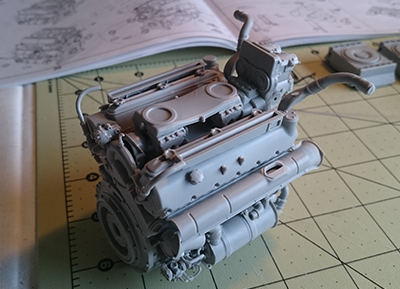
I’ve also started working on the engine, which by now is actually almost ready for primer and paints. Not finished yet, but since most of it will be hidden from view, the detailing will mostly be done on the top part. The engine itself consists of almost 200 parts! The build itself is pretty straight forward, with a few things causing issues when fitted. Most of this was solved quickly before gluing them in place.
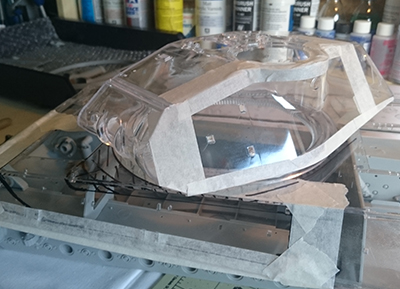
I want to be able to show the interior of the model. To do this, I’ll have to cut out a piece of the exterior hull, enabling you to look inside. I spend many hours debating what to cut out and what not. Eventually I came up with a design that allows you to see a lot of the inside, but also leave enough space for the outside details and finishing. I’ve used the clear covers and masked them with tape as they allow me to see inside without cutting anything. This will eventually be transferred to the solid plastic version, which is easier to work with.
Well, that’s it for now. Photos will be uploaded today as well, so don’t forget to have a look. And as always, until next time!
Return to Previous Page

Niek Nijsen Ltd.
Comp. Reg. (UK): 13778584
VAT. Reg. (UK): 398 4757 24
info@nieknijsen.com
Copyright
Niek Nijsen Ltd. © 2008 -
All Rights Reserved
Privacy Policy | Terms of Business