
Assembly And More Paint
Posted on March 23, 2016 by Niek Nijsen
A lot has happened during the past month and the Tiger is slowly coming together. But still far from finished. Since the last update I’ve done the following:
- Added decals to the firewall
- Weathering of the front hull section
- Assembling parts in front of the hull
- Enhanced the hot air extractor tube for the gearbox
- Radio-operator seat and area enhanced
- Painted the first few MG ammo pouches
- Constructed, painted and fitted the gyrocompass
- Power unit for the compass build, painted and fitted
- Adjusted the tracks to get the correct slack
- Lots of work on the turret (rear hatch, commander’s hatch, and zimmerit)
- A lot of welds have been added to various parts
- Redesigned the cut-out section of the turret
First up was adding some decals to the firewall. A few decals were taken from the kit, as well as from the AFV Modeller sheet and the BK-117 project. With the decals added I sprayed all of the lower hull with matt varnish to remove the gloss look of the ivory paint. Not sure why, but I still seem to have a bit of glare around the decals, making them a bit too obvious being decals and not writing. Anyway, I’ll hopefully be able to reduce this with a bit of weathering later on.
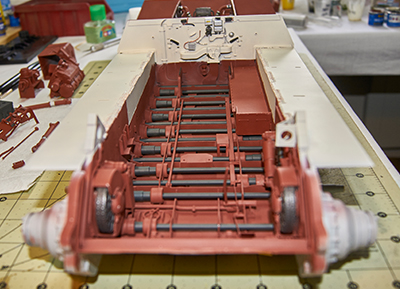
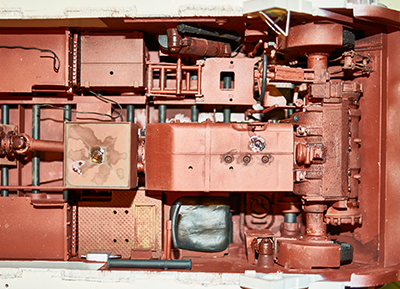
The front of the hull section has received most of the work lately. With all the parts now painted and ready for weathering and be fitted in the tank, I started by focussing my work on the hull floor. I used various Flory washes (dark dirt, grime and black) and combined these to make a wash which would offer me different tones at random. With a big brush I applied the wash around the gearbox area, brakes, suspension and other places I thought would get dirty with leaks and oil stains. As this was drying, I added a few different tones of brown pigment to the mix to create dirt around the driver’s and radio-operator’s seat areas. With the wash now almost dry, I sprinkled the pigment around the same area to add a bit more of a 3D effect to it all. With all of this dry, it gave me a matt finish. Yet as we all know, oil tends to have a wet-look to it. So I used gloss varnish and dabbed it around randomly to create this wet-look effect of oil stains that haven’t dried up yet. The process was then repeated for all the parts that were going to be fitted in the front of the hull.
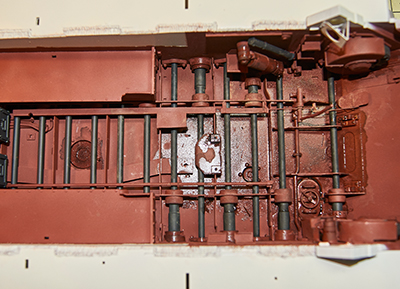
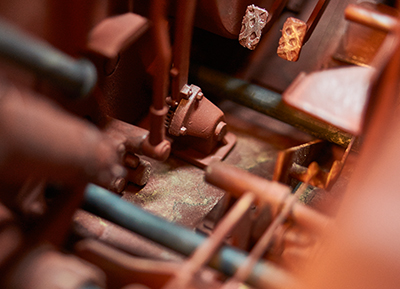
With all the weathering done, it was time to add all the parts together and start bringing the tank to life. I worked my way from the back to the front, with the fuel tanks and batteries going in first. The steering housing was next and slotted in place with little problem. Before placing the gearbox, I added the drive chain sections to the turret power convertor and gearbox. The assembly was then placed into position on glued to the floor and engine in the back. The connection between the gearbox and steering housing needed a bit of filling, but I eventually solved the gap issue by moving the gearbox inside the cover a bit and re-glue it. Now that the main items were in place, I could focus on the small parts for the driver. I added levers, pedals, a floorboard, handbrake lever, breathing tube, flashlight, and the steering wheel itself. The seat isn’t finished yet and will be fitted later. With all this in place, it starts to become very cramped in there and I’m starting to wonder how someone could live in there, especially during battle.
An item that needed some extra work before being able to become part of the tank was the hot air extractor tube for the gearbox. This will be added to the back of the gearbox, but is missing its distinctive welds. I added these using PVA glue and a cocktail stick. Once dry I painted the item in the hull red like the rest and applied a bit of pigment for weathering. It was then glued in place.
The seat for the radio-operator is moulded as a simple piece of plastic, which needed a lot of work to match the real thing. I cut the plastic seat off completely and closed the gap with a piece of styrene sheet. Once the glue had dried I mixed some modelling clay and started shaping it based on photos of the real seat. After some shaping and reshaping until I was happy, I painted the seat black and the rest of the frame hull red before weathering using pigments again. I made sure everything had plenty of time to dry before fitting it into the tank. The box behind the radio-operator also received some work in the form of adding some L-shaped strips to form a rectangular in which a box with MG parts will fit later. This was then painted and weathered as before and glued in place. The junction box behind it was painted and detailed using a silver gel pen. A lot easier to control than a brush. The back support was added and various boxed with spare parts for the MG gun too.
With the right side almost finished, I moved back to the left side and began work on the MG ammo pouches. I decided to only add 2 to the rail and set the scenario in which the others have already been used. The pouches were painted with a brush in a tan colour with a black lit before weathered with a wash. The wash was then toned down using a moist cotton bud until I was happy before gluing them in place with CA. Normal Tamiya glue didn´t work as the pouches are a resin cast. A bit of scratching was achieved using a silver/metallic pencil.
Up next was the gyrocompass which is fitted right in front of the driver. This was a multiple part resin cast item which I got from AFV Modeller. The hole in the back was drilled out to fit wiring later before being painted black. All my black is actually anthracite to avoid using pure black colours. I placed the decal on the main part and once this dried I glued the front section on top of it. In order to recreate the glass, I laid the part flat and added a generous amount of PVA glue. This then dried completely clear and gave me the look I was after. The assembly was glued in place after weathering and the wires attached.
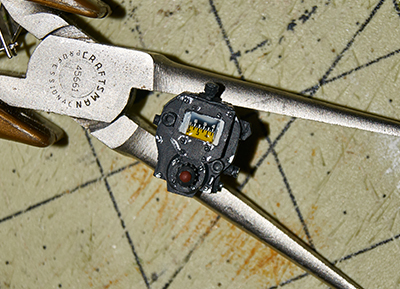
The gyrocompass has a separate power unit which is another resin part I got from AFV Modeller. (The site is run by David Parker, well known within the modelling society for his King Tiger build). As with the compass, I drilled the holes in preparation of the wires before painting it black. Highlights were achieved using a metallic pen and the decals were taken from the BK-117 project (I wasn’t going to use these anyway since I’ve got 4 sets of them and they happen to be in German too). I placed it on the supporting rack and wired it up using 0.5 mm electrical wire.
After all this I needed a little break from the front section and had a look at the tracks. I’ve read a lot about them being too long, so I wanted to see how much work this was going to take. I placed all the road wheels on the suspensions and placed the sprocket wheel at the front. As with the real machine, I then ‘drove’ the tank over it while dragging the tracks around. I turns out I will have to remove 2 links in order to get the right look. I reversed the process to remove the tracks before cutting them to size. The tracks will be put aside for now until a later stage where they’ll be painted and fitted to the tank.
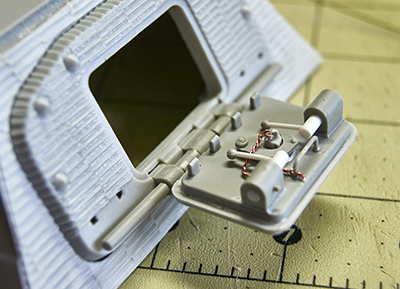
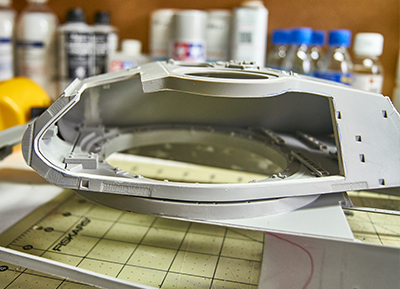
I moved my focus to the top section of the tank and did some work on the turret. I wanted to see how the new zimmerit sheets look like once in place and began working on the rear of the turret. The armoured plates were glued in place and the resin replacement part was fitted and glued into place. I decided to leave the rear hatch open, since it will add to my diorama, but also allow for extra light to enter the model. The hatch isn’t too badly detailed in itself, but could use some extra work. The locking mechanism is moulded in the closed position, so this had to be rebuild from scratch since the hatch would be in the open position. I cut off the handles and drilled out the blocks before replacing the missing parts with plastic rods. Small holes of 1 mm were drilled and the new handles were glued in the open position. The new assembly is actually fully workable and allows me to place it in both the open and locked position. I initially made a chain by twisting copper wire using an electric drill, but after being pointed in a different direction I removed this again. It will be replaced with a miniature chain from a German company called “Steba” once it arrives hopefully later this month. Really worth having a look at for all your miniature modelling requirements (find their catalogue here).
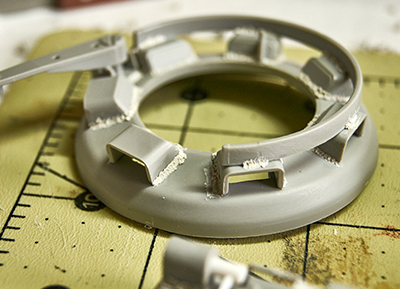
With the rear hatch now almost complete (I’m waiting on an Aber set to get the rest done) I had a look at the commander’s hatch. Trumpeter has moulded the periscopes as part of the upper ring, but I’ll be replacing them with clear resin parts, so they had to be cut out. I used a knife to get a rough cut before using the sanding sticks to achieve a smooth finish. With the periscopes removed I glued the armoured covers in place and added the ring which will hold the AA MG gun. The mechanism for opening the actual hatch was slightly modified and glued in the open position. As mentioned before, I´ll be opening as many hatches as possible to maximize the amount of light entering the model.
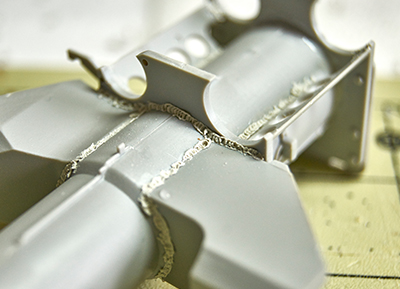
A colleague of mine at work gave me a syringe which I could try for creating welds. The syringe is normally used to draw blood and has a hollow tip of around 1mm in diameter. I cut the tip to about a quarter of its length and placed some white putty in the reservoir. Taking quite a bit of pressure, it does allow me to precisely add the putty where I want it. I gave it a go and started applying the putty around the periscope armoured plates. I then used a tool with a round head (can’t remember what they’re called) to create the welding look. Not perfect yet, but I’m starting to learn how to use it and as the photos might show, the welds are starting to look better each time. With some putty left in the syringe, I added welds to the gun as well before cleaning it all.
Since I wasn’t entirely happy with the way my cut-outs looked, I had a brief discussion with my dad who gave me some good ideas. Though slightly deviating from the original plan, I followed the contours of the turret and cut the front bit away too. As with the rest, I left a 6mm edge all the way around which was achieved using a Dremel and sanding sticks. The gap between the two plastic plates will be filled with putty later on and thus create the armour thickness like I’ve done with the rest of the cut.
That’s it for now, lots more planned for the near future. I’ll be working on the F-16 now as well, since it arrived today and has a deadline for its completion, so progress may be a bit slower than it has been for the last few weeks. Thanks for reading!
Return to Previous Page
Niek Nijsen Ltd.
Comp. Reg. (UK): 13778584
VAT. Reg. (UK): 398 4757 24
info@nieknijsen.com
Copyright
Niek Nijsen Ltd. © 2008 -
All Rights Reserved
Privacy Policy | Terms of Business