
A Real Update?!
Posted on April 28, 2017 by Niek Nijsen
Before I start writing to you about the latest on this build, I owe you a big apology for the enormous gap in updates. As you may know, I have moved house a few months ago and had to rebuild my modelling cave from scratch. This resulted in preventing me from doing any work on my models and caused a big delay in the overall progress. However, the new cave is finally complete and I am ready to get back to work on the King Tiger. For those interested in my new (and old) model cave, have a look at the special page I’ve created for it. It has photos of all my model caves, starting in the USA all the way up to the latest one in the new house.
So, with the formalities now out of the way, let’s get started with this update and get you back in the loop on what’s going on with the King Tiger. Currently the build is a little all over the place, with me working on various items throughout the kit. Work has been done in the front, the hull and upper turret. Let’s start with the front MG gun and radio system.
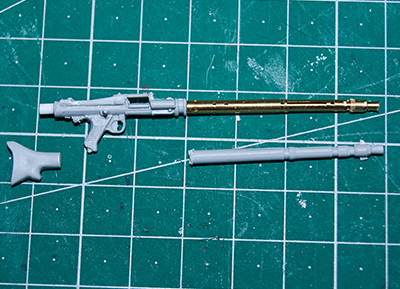
The kit guns are decently moulded, but the barrel could do with an upgrade. So I’ve invested in a few brass turned barrels to replace all three of them. Because this particular one is located in the front, I had to remove the butt-stock and replaced it with a styrene rod, to which the stock would be attached if in use. I then assembled the system in which the gun is mounted, but forgot to take photos of it. They’ll be online with the next update, as I still have a little detailing work to do on them.
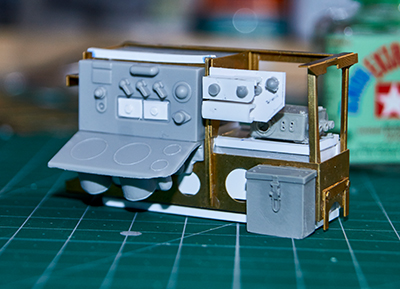
I moved on and gathered the courage to start the new PE radio rack by David Parker over at AFV. The set is absolutely superb, but my poor skills in handling PE haven’t done it any justice. I recently ordered soldering paste and a blowtorch, so I might have to try this PE thing again once it gets here. But for now it’ll have to be put together using CA glue and styrene. I elected to make a hybrid out of the new parts and a few of the old kit parts, in an attempt to reduce the workload slightly. Don’t think it turned out that way, but overall I’m quite pleased with the result for the time being. Once I get to super detail it with wiring and such, I might have to redo a few bits to make it look the way I want it.
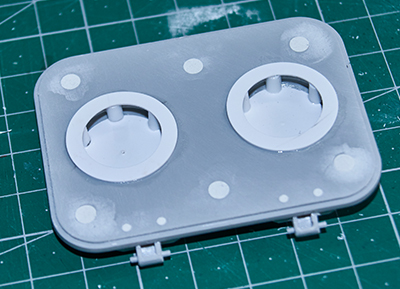
Having spent quite a bit of time on the front office, I moved my attention to the rear of the tank and did some work on the engine hatch and covers. I added the PE mesh to the armoured covers, leaving one of them off which I might bend to add a little damage to it or decide to leave it off completely. I’m not entirely sure yet. The engine hatch itself required a lot of work in order to look something like the real thing. I began by filling the ejector pins with putty and sanded it all smooth. I then placed styrene rods on the inside, which will lift the covers a little, allowing air to pass underneath. A styrene sheet was glued on top before adding the dome-shaped covers on top, representing the thickness of the armoured covers. On the inside I added a ring of styrene, which is basically the bottom of the assembly and is also the part that was welded onto the hatch to hold the entire assembly in place. The photo I’ve uploaded doesn’t show the welding details yet, but will be visible in future uploads.
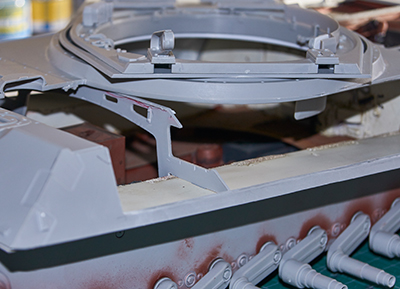
The gap on the inside of the hull surrounding the turret ring was covered by cutting out a ring from styrene sheet and glued in place. I still have to add details to this ring, but just the frustrations of making it in the first place made me push this job a little further down the line.
With most of the interior now coming together, I moved back to the front and added a few kit and resin parts to the radio rack. A few panels were made from scratch using styrene and spare parts as they were missing from both the kit and the aftermarket set by David Parker. I still have to add all the wiring, but I’ll do this once I’m sure it fits and I’ve painted the whole assembly.
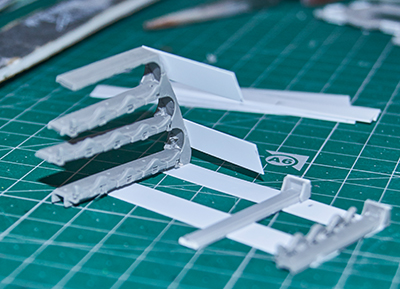
I decided that it was time to tackle a very laborious and boring job, namely the ammo shells. There’s quite a few of them fitted to this machine, and although I won’t be adding all of them, there’s still plenty left to do. I began by cutting the useful bits of the resin upgrade set, as they’d warped pretty badly during production (also an aftermarket upgrade by David). Using a combination of resin and kit parts, it put the ammo racks together. I then added thin strips of styrene that were present in the real machine as well to space them correctly, using a few shells to measure it all out. Most of them were straight forward, although two needed some modification, as they would otherwise block the view of the interior. I cut them in strategic places allowing viewers to still look inside once the model is complete.
The same problem existed with the support struts for the upper hull, which span the full width of the tank. Initially I had envisioned a wavy pattern to make it more playful, but in the end went for a more straight approach as I felt it suited the model better. Again styrene strips were used to add welding blocks to the struts, which will receive welding details once painted and fitted to the machine.
And that’s pretty much were we are now. A lot left to do, but the list is definitely getting smaller. With all the work going in, we’re not too far off another time-lapse either, only a couple hours of building needed. Hopefully I’ll have another update soon, especially now that the Spitfire is nearly complete and I can focus on this build again before starting a new one. So until then, please enjoy the new photos and let me know what you think.
Return to Previous Page
Niek Nijsen Ltd.
Comp. Reg. (UK): 13778584
VAT. Reg. (UK): 398 4757 24
info@nieknijsen.com
Copyright
Niek Nijsen Ltd. © 2008 -
All Rights Reserved
Privacy Policy | Terms of Business