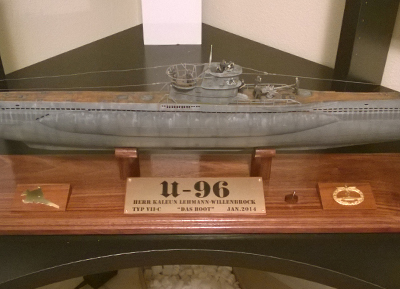
U-Boot VIIc "U96"
I've always had a special interest in the 2nd World War, especially in teh German submarines, or U-Boats as they were called. Building one has been on my list for a very long time, and I actually started a smaller size during my time at University. After finishing my previous large scale models, I decided to stick with the 1/72 scale and started looking for a model online. I found one fairly quickly and bought it without hesitation. What followed was an array of PE, aftermarket and many other parts to aid the project. An undertaking that was going to take me more than 300 hours to complete.
Model Info
Scale: 1/72
Manufacturer: Revell
Status: Completed
Date Started: February 15, 2013
Date Finished: January 31, 2014
The Making of
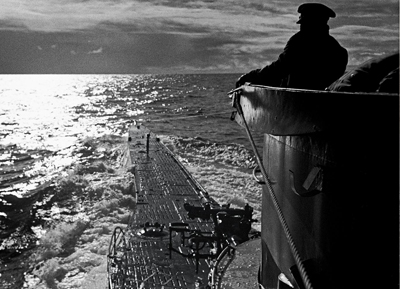
Photoshoot
Photoshoot
Posted on February 14, 2014 by Niek Nijsen
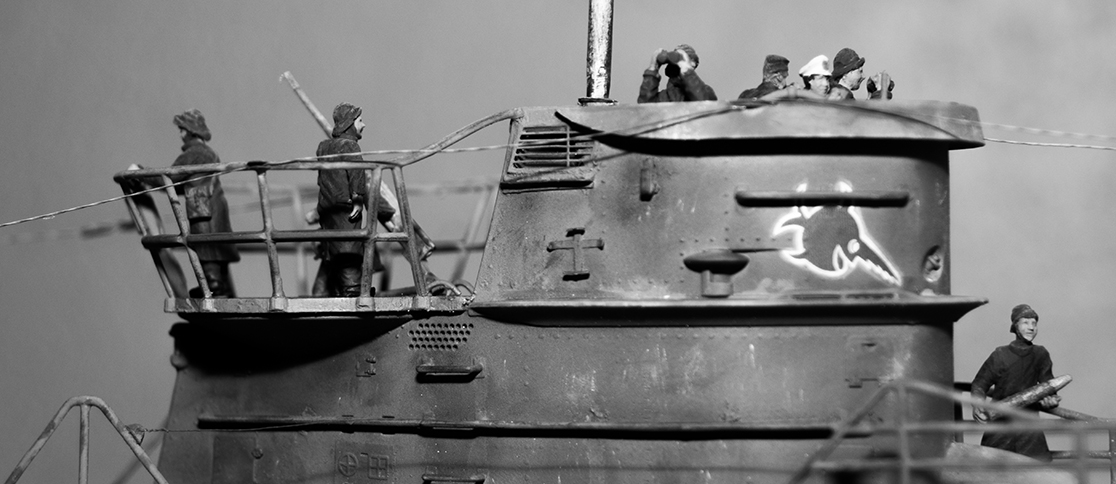
Just before she was shipped across the Atlantic to Europe, I managed to take some photos. I have uploaded two albums, a Black & White edition and a full colour edition with photos by Peter Bello.
Photos
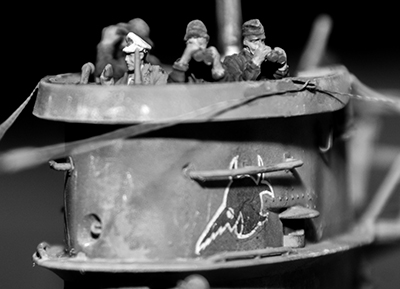
Bereit zum ablaufen
Posted on February 01, 2014 by Niek Nijsen
Herr Kaleun, wir sind bereit zum ablaufen!
Finally, after a staggering 350 hours of cutting, sanding, fitting, gluing, painting and adding many, many details, my U-96 project has come to an end.
The crew has been added, the torpedoes are being launched and the wiring has been rigged. It's been a race to the finish to complete the project before the deadline, which I managed to do last night, on Jan. 31st of 2014. With only a few hours remaining, I added the final layer of coating, making her ready for display.
In the meantime Lyle has done an amazing job on the stand. I can hardly imaging how it came from an idea in my head to the actual product at the end, simply beautiful. I can't thank you enough Lyle, you've done an outstanding job! Simply unbelievable!
It has been an amazing project, my biggest so far. The only thing that remains now is the photoshoot, which I will be doing next week before she's being shipped home. I would like to thank every one for their support and interest in my build. As always, hope to see you on the next one!
Weathering
Posted on December 28, 2013 by Niek Nijsen
With the holidays I finally found some real time to work on U-96 again. So far I've made a huge progress in regards to painting, weathering and adding the last items to the boat.
The crew has been painted and waiting to be added to the project. The equipment that is on top of the command tower, such as the flak gun, periscope and UZO all have been painted and will be added after the weathering process. Crew will be added once the wiring has been done.
Read more
Guess what, more paint
Posted on November 26, 2013 by Niek Nijsen
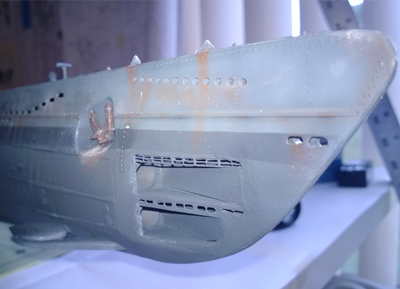
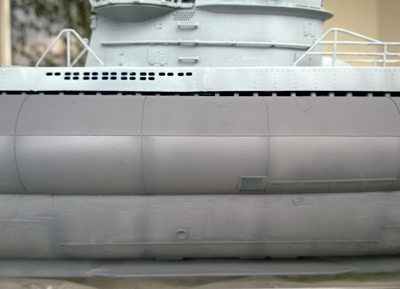
And again a layer of paint has been applied. After looking at many photos, I found out that Revell made a mistake in their paint schematics. So that required me to raise the lower paint layer by almost a centimetre. But while looking at the photos, I found out that the waterline was almost perfectly aligned with my original paint layer. This allowed me to start the weathering process way before I intended to. Because salt water is pretty harsh on the paint, it resulted in a faded colour of the boat below the water line. By adding a little black paint to the "Dunkelgrau 51", I managed to get a slight colour difference between the layers. This created a perfect wash effect. Have a look at the photos for the result.
Read more
Another layer of paint
Posted on November 14, 2013 by Niek Nijsen
Another layer of paint has been applied to the project. The "dark grey" colour is now covering the bottom half of the boat, which makes it look like the real U-96. Still many layers to go, but the end result is slowly starting to show.
Paint progress
Posted on November 10, 2013 by Niek Nijsen
The next layer of paint has been added to the project. This time it's the "light grey" that forms the top section of the dual tone. The result is pretty much what I hoped achieving, since the pre-shading is still visible, creating a nice visual depth effect. Photos as always through the button below.
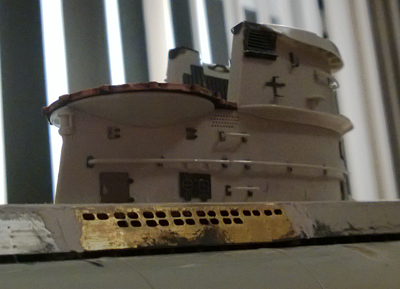
First exterior paint is on
Posted on November 07, 2013 by Niek Nijsen
It has been many weeks since my last post and progress has been slow. I've been waiting for the mail service to deliver me a package that my dad send me with some highly needed drills and thin metal wires. After almost 4 weeks of waiting it finally arrived. In the meantime I gave the boat it's first layer of primer and pre-shading. It's starting to look like a real boat now.
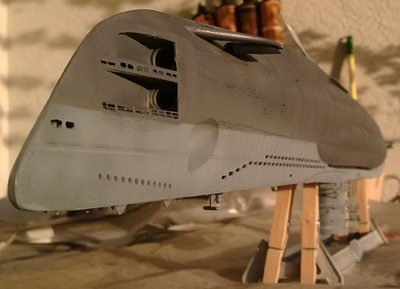
Unfortunately making the rail guards and "wintergarten" myself didn't go so well. After a few attempts I decided to sand down the originals, thereby making them thinner and more realistic. The result is not bad, although adding the small PE parts was a **** job. Now that the rails are on, I can continue painting again. First there will be the light grey, then the dark grey, post-shading and many more layers after that. The crew is starting to take shape as well. Only 2 more figures to go, which will be part of the gun crew.
As always, photos are to be found in the gallery through the link provided.
Almost no parts left
Posted on [Month] [Day], 20xx by Niek Nijsen
Progress is fast and almost all parts have been added to the boat now. Still have a few rails that need to be added as well as all the periscopes and guns. This will be done later, after I painted the hull and deck. That's what is going to be done next. I will start off with a primer before adding about 6 layers of paint. But you'll get more details on that once I start with the paintwork.
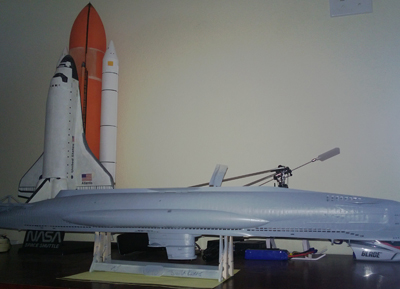
For now, enjoy the photos I've uploaded that show you all the details that have been added using the PE parts and some scratch parts from my Chinook and Space Shuttle projects.
Work on the exterior has begun
Posted on August 28, 2013 by Niek Nijsen
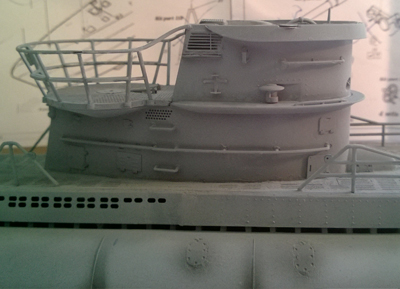
It's been a while since my last post. I had a friend come over which prevented me from working on my boat too much. But in the last few days, I got a lot done. The interior has received all 5 layers of paint and is now finished. I've started working on the exterior by adding details such as the saddle tank hatches, PE parts to the command tower and the first 2 out of 5 decks are in place. Still a lot more to do, but she's coming along nicely now. Don't forget to view the new photos!

First paint is on
Posted on August 18, 2013 by Niek Nijsen
Finally, after finishing up all the internal ribs and getting the gaps filled with the brass parts, I painted the interior. A huge difference already, even before I added all the rust and other weathering effects. Many photos have been uploaded to show you the progress. More updates to follow soon!
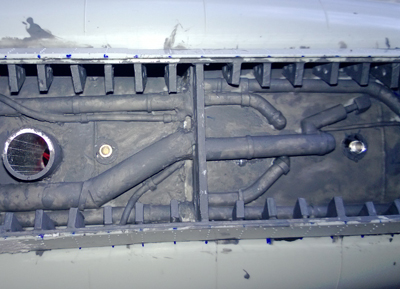
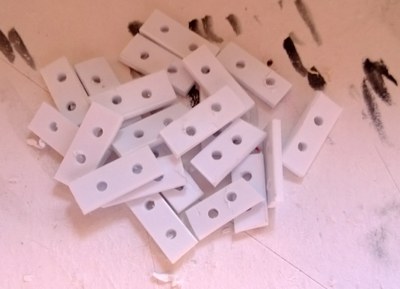
So many ribs
Posted on August 06, 2013 by Niek Nijsen
I started working on the internal ribs. What a sh*ty job... I've made the first batch of 43 pieces, and still have 67 more to make. At least the first batch is now in place and the command tower has been added as well. Once the glue has dried, I can finish that the tower with putty and place the last ribs before painting the whole interior hull. New photos have been uploaded as well.
The progress so far
Posted on August 04, 2013 by Niek Nijsen
After more than 10 hours of research, I found out that the boat I want to build is different than most other U-boats from that time. Good thing I bought the book which has almost 250 photos in it, most of them showing what I'm looking for. Only thing I am going to do different than the real thing, is add the laughing sawfish emblem to the side, although it wasn't on the real boat during the patrol I'm building. It just looks AWESOME! Besides that, I ordered the wrong paint colour, so I had to buy the correct ones as well. Unfortunately, the 30 day return policy is long gone now...
Read more
Niek Nijsen Ltd.
Comp. Reg. (UK): 13778584
VAT. Reg. (UK): 398 4757 24
info@nieknijsen.com
Copyright
Niek Nijsen Ltd. © 2008 -
All Rights Reserved
Privacy Policy | Terms of Business