
Ready for battle
Posted on June 21, 2017 by Niek Nijsen
With the model now pretty much done, I started work on the base. I saw this great idea on the Flory Forum and thought it would look really good for this model. As you may have noticed, I like to create a diorama-type base for all my models (Aside from the Space Shuttle). So for this one, I would add a few figures and place it all in a muddy field somewhere in the UK.
I bought a cheap photo frame and removed the glass before gluing the bottom to it. I cut strips out of 2 mm plastic card, which would form the sides of the box. To strengthen it all I placed rectangular tubes on the inside of each corner. The top was made of a thin hardboard sheet. Once all the glue dried (I coated the inside with regular hobby glue to get a solid bond and fill all the gaps the superglue had left behind) I coated the top with a layer of filler and shaped it to my liking. The sides where then filled as well to make all the corners look smooth.
Now that the basic shape of the box was done, I gave the whole thing a coat of primer before spraying the sides in the same camouflage style as the aircraft itself. On the left side I added some invasion stripes and the right side received the RAF roundel. The front remained in primer only as I would add a printed decal later on. The top was sprayed with a green base coat before thinned wood-glue was painted on and grass added on top. In an attempt to keep the grass on the box and not fall off with the slightest of wind, I applied a little trick my dad taught me when I was younger and build landscapes for model trains, which is to thin the glue enough so it can be sprayed on using a hand spray bottle (same as used to water plants).
The basics for the diorama were now done and I continued by applying mud (a mixture of pigment, hobby glue and water) which was then followed by applying different tones of green paint with the airbrush. Lastly I used “Woodland’s Realistic Water” to add puddles.
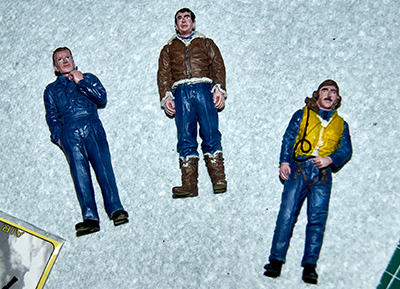
The figures were next to be painted. A primer coat was followed by a blue coat with the airbrush (the same blue I used for the markings, MRP-124). The jacket, boots, and lifejacket were all painted with a brush. I tried to follow a guide I found online to get some “life” to the face, but I guess a little more practice is required. Anyway, I’m quite pleased with the result for a first attempt. The figures received some detailed painting and a wash to bring it out some more. Lastly was a layer of matt varnish before adding mud effects to their boots, too.
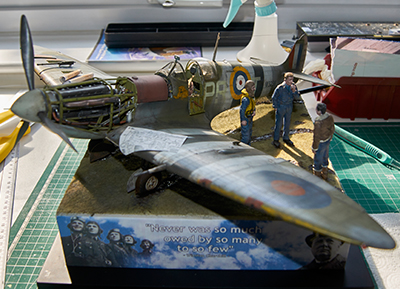
In order for the Spitfire to match the diorama with the opened up front section, I printed various blueprints on A0 paper (all in scale of course). These were then rolled or folded before glued onto the wings, as if they’re being used as a guide while working on the plane. The .303 gun I removed from the wing was placed on top, ready to be fitted.
All the sub sections were now finished and ready to be fitted. I glued the custom-made decal (which I designed in Photoshop and then printed on labelling paper) on the front of the base before placing the plane and figures on top.
And that’s it, job done. The engraved plate, which will be mounted on the base of the frame, is being made at the moment. As soon as it’s finished I’ll take the proper reveal photo’s. So this will be the last build entry, the next being the official reveal. I hope you’ve enjoyed following this build and the accompanying photos. I’ll be going back to the King Tiger (finally) when I’m back from work in 3 weeks. The Spitfire build will be replaced by a new project, the McLaren MP4/4 F1 car. But more on that in the near future. Until then!
Return to Previous Page

Niek Nijsen Ltd.
Comp. Reg. (UK): 13778584
VAT. Reg. (UK): 398 4757 24
info@nieknijsen.com
Copyright
Niek Nijsen Ltd. © 2008 -
All Rights Reserved
Privacy Policy | Terms of Business