
Oldschool for old plane
Posted on June 05, 2017 by Niek Nijsen
Last time I wrote something about the Spitfire I left you with a model halfway stripped of its paint. Now, after going back to using lacquer paints again, I’ve got some good news! But let’s go back to the where we left off previously.
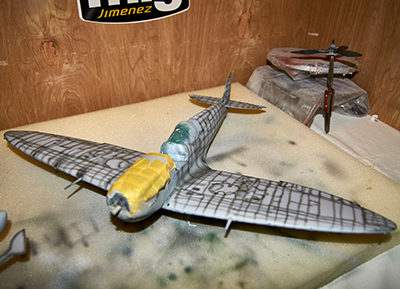
I continued the process of stripping paint as described before, only this time I was clever enough to wear some cloves. Saved me a lot of cleaning up afterwards. Using a big brush and lacquer thinners I stripped the remaining paint before priming the whole model again with Mr. Surfacer 1200. This was then followed by pre-shading using MRP’s Nato Black (MRP-77). I’ve heard Phil talk about it a lot, but I couldn’t believe how easy this stuff is to spray! I was hooked straight away and will never use any other paint again. The fact that it’s so extremely thin makes it perfect for spraying in thin layers, allowing previous paintwork to come through without covering it too fast. Brilliant.
After pre-shading I gave the bottom-half a coat of Sky (MRP-118), which covered beautifully after only 2 layers. The top half was then sprayed in two-tone camo using Light Green (MRP-109) and Medium Sea Grey (MRP-112). As before, these when on very easy when spraying at a very low pressure (about 10psi). I didn’t cover the model the same everywhere in an attempt to start some of the weathering and colour modulation.
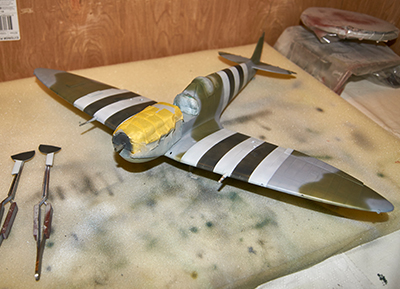
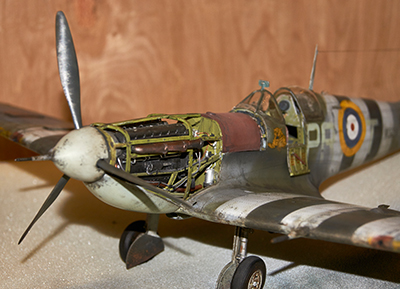
With my mind set to having the invasion stripes on the model, I measured the width of each band using photos and drawings and masked the area that was to be sprayed. A layer of white (MRP-4) went on which was then masked again to allow the black stripes in NATO-black to go on top.
With the basic colours now back on the model, I applied the masks in order to spray on the markings. For this I used White, Marking Red (MRP-123), Marking Blue (MRP-124) and Marking Yellow (MRP-122), in that order. A slight misalignment happened when spraying the yellow band, but this was something I was able to fix later on during the weathering phase.
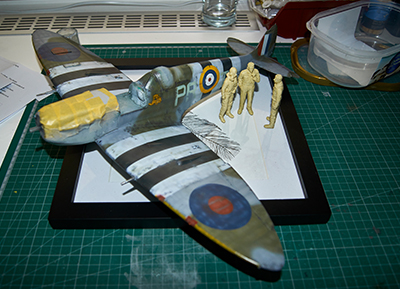
The next step consisted of applying the decals. Despite having a few options from the box when it comes to squadron markings, I didn’t really like them and decided to find something more suitable. As I went through my spare decal box, I found some left-over markings from the Hind build which were perfect for this kit. A fierce looking tiger that appears to be jumping its prey. I cut of the front paw as this would be located on the tank cover (which is not present on my model) and placed the main body under the window in front of the door.
The remaining markings were sprayed on as well, using the colours described before, which consisted of the leading edge and gun ports. I then mixed the original colours with a bit of white or black to create high- and lowlights on the panels and panel-lines.
At this stage I thought it’d be nice to have a look at the final diorama setting, see if it all works out like I had it planned in my head. I ordered a photo frame a while ago and will attempt a somewhat raised pedestal.
Back to work; the whole model was given a matt varnish before being covered in the Flory dark dirt wash. This was then wiped off using a paper towel and earbuds until I was happy with the result. The wheels were given the same treatment.
Finally I made it to the weathering stage, something I very much enjoy, especially now that I’ve got some new reference books and techniques I wanted to try. Using a sponge I dabbed on metallic paint to create chipping. Knowing the previous technique, that of a masking fluid, didn’t go very well, I figured this would be a lot easier. In a random pattern I dabbed the paint on, creating small, medium and large chips as I went along. I then used the same trick to “repaint” certain areas that had too much chipping by going back with the original colours.
Since my bird is located in England, and weather isn’t always that good, I thought I’d be interesting to go with a muddy field diorama. So in order to make this work, I used pigments to create the mud stains and effects on primarily the bottom half of the aircraft. The result is pretty good I think, but it created a big mess on my bench!
Time for the uncovering of the engine. I removed the masking tape and blue-tac, which resulted in having to do a few repair jobs, but nothing major. I attached the prop and wheels before placing her on her feet enjoying the evening sun. A wire was strung between the tail and antenna using Uschi 0.005 rigging wire.
And that’s it for now. I still want to do a few touch-ups to the model, but I’ve started work on the base first. More on that later. Thanks for following and your kind comments as always.
Return to Previous Page
Niek Nijsen Ltd.
Comp. Reg. (UK): 13778584
VAT. Reg. (UK): 398 4757 24
info@nieknijsen.com
Copyright
Niek Nijsen Ltd. © 2008 -
All Rights Reserved
Privacy Policy | Terms of Business