
In the name of details
Posted on October 20, 2016 by Niek Nijsen
With the King Tiger set aside for this month, it’s time to focus on the Spitfire again. My aim for this period is to complete most of the detail work, which includes the instruments, fuel tank, and engine.
First I had to come up with something to avoid looking through to the front when taking a peak into the cockpit. I placed a vertical piece of styrene to block the view and glued another one on top to act as a support for the fuel tank. I’ve decided not to go into too much detail here as it will all be hidden from sight once the tank is in place.
Then I started work on the fuel tank itself. Using photos to estimate the distance between the bulkheads and the tank, I drew up a design on paper with the rough dimensions. I used thick styrene sheets for the sides and a rectangular beam to separate them at the correct length. I then covered this with a very thin sheet of styrene to create the correct shape. The bottom was the stiffened with two more beams and closed up with a thick piece of styrene for strength.
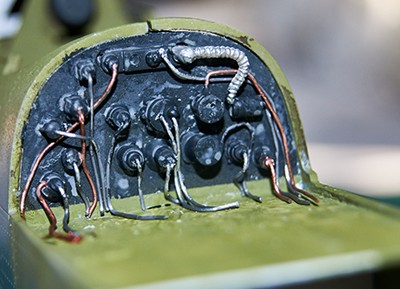
With the fuel tank now ready, I knew how much space I had to add all the instrumentation on the back of the panel. For this I’ve used a lot of spare parts from other kits (mostly engine parts from the Hind) that roughly looked like what I needed. Most of it will be hidden from sight anyway, so it’s more to give you the impression there’s something there. I filled the remaining gaps with pieces of styrene rod before coming in with lead wire. The wires were then painted in both aluminium and copper colours to give it a little more diversity. A grey wash went over afterwards to create a bit more depth to it all.
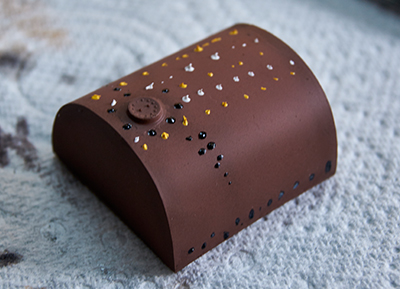
Next was spraying the fuel tank and weathering the cockpit a bit more with oils to match the looks I have in mind for the outside. Having received tips on painting from my fellow modeler Oliver (who’s models are a true inspiration to me, have a look at the last photo on the left to see what I mean). For this I’ve used LifeColor paints, black for the pre-shading and Italian brown for the main colour. I then followed with a mix of the two to darken the bottom halve of the tank. After cleaning the airbrush and letting the paint dry for about 30 minutes I used oils (yellow, white and black) to weather the tank. The same colours were used for the cockpit, although primarily yellow and white.
And that’s it for this short update, the model is drying in the sun (I know, very rare for the Shetlands, I better use it) before I can put it all together and start working on the front bulkhead before merging the fuselage with the wings (although I might do that first, see what’s the best strategy here). Hope to have another update for you soon!
Return to Previous Page

Niek Nijsen Ltd.
Comp. Reg. (UK): 13778584
VAT. Reg. (UK): 398 4757 24
info@nieknijsen.com
Copyright
Niek Nijsen Ltd. © 2008 -
All Rights Reserved
Privacy Policy | Terms of Business