Small (Very Delayed) Update
Posted on January 01, 2020 by Niek Nijsen
A bit more progress on my S92 project:
I've painted the bulkhead using Mr. Surfacer as a primer and MRP's NATO black as the final colour. I tried to break it up a bit by varying the thickness of the paint, thus giving it a little bit of a grey hint to it in places. The brass is done with Mr. Hobby metallic paint and a brush.
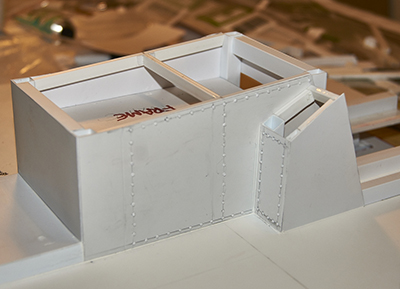
Next, I worked on the main cockpit, starting with the center console. My first attempt turned out to be a bit of a struggle, especially because the styrene sheet was slightly warped (I've got a massive roll of this stuff and it's been rolled up for too long). This was followed by punching 166 rivets and gluing them in place. However, things got even worse when I found out the whole section was glued in place too far aft, by a whopping 17mm!
So, out came the cutters and I removed the entire thing, starting from scratch again. This time I approached it slightly different, as in I created a support box first which would sit inside and keep the styrene sheet straight and flat, instead of curling up on me again. I spent a few hours at work (slow shift) punching about 500 rivets and glued 166 of them back on when I got home.
I also built the section that houses the gear operating lever, which is used to raise/lower the gear. This box was also made from styrene and covert in rivets.
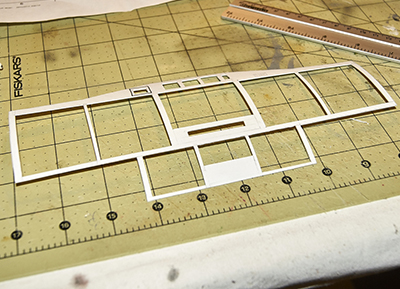
With the center console now done up to the point of making all the individual instruments and radios, I shifted my attention to the main instrument panel. A copy from the maintenance manual was scanned and enlarged which was then measured and converted to scale. I had to adjust a few sizes, as they turned out pretty wonky in this scale (think 0.4 mm and such). So, although nobody will notice, the real-life instrument panel is an impressive 3 mm shorter than mine... With that confession out of the way, I drew the first template out and noticed that a few of my lines didn't add up. As it seems to go with this build, I started from scratch again and drew the whole thing on a new piece of styrene. After roughly 4 hours of measuring, drawing, and restarting the process again, I ended up with a panel I was happy with. Then the long process of cutting each section began, which will allow me to make the instruments separately and slide them into place once done. It's easier to work this way, especially when adding the lights later on. Unfortunately, I ran out of styrene beams, which I use to strengthen the panel and create the boxes which house the displays once completed So that's pretty much where I am now, waiting for more raw materials to arrive before continuing this saga in the near future. See you then!
Return to Previous Page


Niek Nijsen Ltd.
Comp. Reg. (UK): 13778584
VAT. Reg. (UK): 398 4757 24
info@nieknijsen.com
Copyright
Niek Nijsen Ltd. © 2008 -
All Rights Reserved
Privacy Policy | Terms of Business