Progress is slow, very slow
Posted on March 26, 2014 by Niek Nijsen
Slow, very slow… That’s how this project is progressing. I’m sure some of you have already given up on this project, wondering if it will ever finish. I must admit that at certain points of this build I thought the exact same thing and was ready to bin the whole thing. But I can’t, simply because I made a promise to someone who has done great things for me. Let’s get going with this build!
A large period of time has passed since the last blog update (a staggering 5 months!) and I did manage to get a few things done (or a large part of it). A short list of things are:
- Merging both halves together
- Rear interior almost finished
- Cabin seat detailed and painted
- Cabin bags shaped
- Nose bay opened
- Cockpit detailing
- Floor adjustments
- Engine cowls and scoops
- Skids rebuild
- Building a temporary stand
- Winch made from scratch
Turns out I have done quite a lot lately. Time to get into the details.
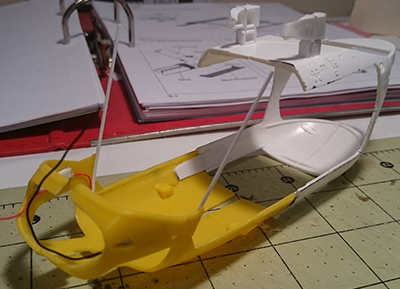
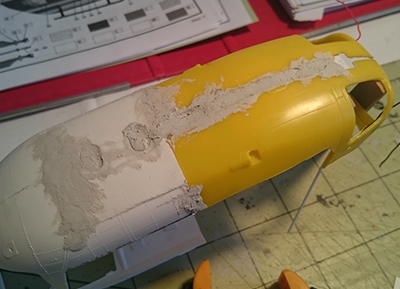
First off was merging both halves of the fuselage in order to get the shape right before I could proceed with anything else. A task I hoped would take a lot less time to achieve, but sadly the model had different ideas about that. It took me the biggest part of 2 days to get it all lined up and looking right, with all the dimensions being correct. Biggest problem was actually to make sure the model would stand up straight once put together. Perhaps it wasn’t the best idea to merge the BK117 with the EC145 halves, but I must say the end result is worth all the troubles. What followed was hours of filling gaps, sanding and filling more gaps before sanding it again. What did I get myself into this time…
The rear interior is now almost completely finished and waiting to be added to the model. I’ve added the rear seat (bench) and decals before giving it all a nice satin coat to seal it off. I’m happy with the results, although I’ve learned a few things I’d do differently on the next project. The final cabin isn’t ready yet however, as I’ll be adding medical bags, a stretcher and a few other bits and pieces once it’s placed inside the model.
The cabin seat itself received PE seatbelts (left over from the Chinook project) and was painted all by hand. The seatbelts were so small I couldn’t really use the airbrush for this, since masking all of it would take an immense amount of time. The only thing I need to add to them later is a pair of headsets, which I still need to make, for the passengers and patient.
While working with putty and clay to merge both halves together, I shaped the stretcher and created a bunch of medical bags to add to the details and realism of this model. Still a lot of work to be done on these (like adding straps, decals and fine details) but the rough shape and red paint is done.
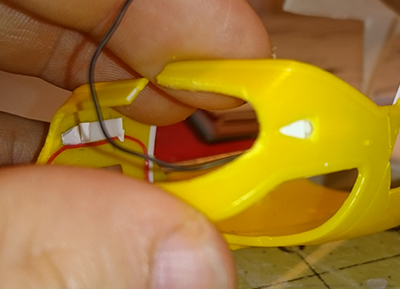
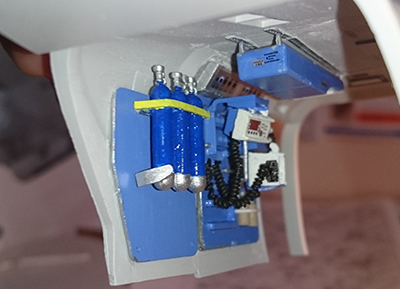
This project originally started off as a challenge, were part of the terms were that I’d add the electronic components in the roof of the cabin. However, by doing this, I’d have to lower the entry hatch for this, thus blocking the view inside the cabin. A bit of a shame if you ask me, so after some negotiating, we agreed that I would leave that hatch closed, but would open the nose bay and rebuild all the components in there. So I started cutting and sawing, slowly opening the nose bay without damaging the fuselage too much. Overall not a bad job, although both halves turned out to have slightly different dimensions once cut out. Great, more sanding and gap filling later on…
The cockpit has also received some attention in a long while. I’ve added a few bits and pieces which will later become part of the ventilation system. Careful cutting of the openings in the nose and many small pieces of plastic card were needed to achieve a (somewhat) resemblance of the real machine. Still a lot of more work to do there once the 120 EURO (!!!!) cockpit upgrade kit is in. Better make sure I don’t do anything stupid there…
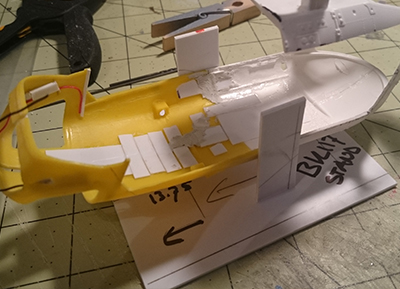
The floor has been sanded completely and is now basically a flat piece of plastic. I’ll have to add all the details again by using PE parts from the EC145 upgrade kit as well as plenty of scratch building. I’m probably going to make a second (very thin) floorboard to go on top of this one, or do a lot of filling and blending later on to have a smooth transition with the fuselage openings (like the doors and walls). Still haven’t decided what will be the easiest way of doing this, so it’ll have to wait until the fuselage has taken more shape and I get to see what I’m dealing with.
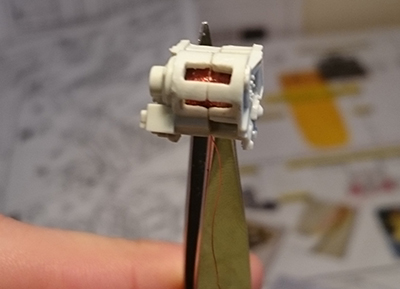
Work on the engine cowls never seems to finish and I’ve been scribbling panel lines and thinning the walls near vent openings. Additional openings were created for air intake scoops, but will require a lot more work before that’s done. Measuring and cutting of the fire walls inside the engine bay has also been done, but I’m not completely convinced this will be in the final product. I’ll probably have to add the roof to the fuselage first before I can cut them to size and.
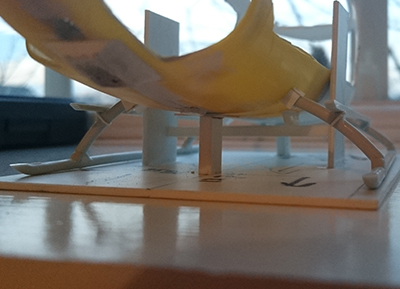
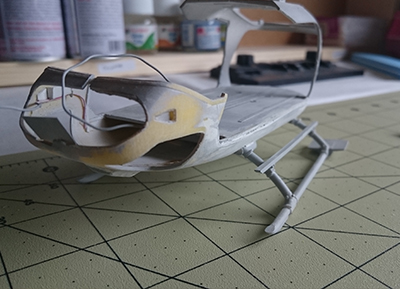
I’ve recently shifted my work to the lower halve of the model again, shaping the skids. The biggest problem with this model is the fact that Revell didn’t get their measurements right. The model is sitting way too high on the skids (about 4 mm in scale, which resembles 13 cm in real life) and are too far apart. So I started by building a stand which would allow me to get the correct attitude for the aircraft. I then bended the skids to the correct shape by heating them up and added a lot of detail to them using plastic strips. Overall a solid 5 hour job, which I then threw in the bin… Why you might ask? Well, as soon as I released the clamps that held everything in position, the skids jumped up, floating in the air at about 3 mm of the ground. Turns out that Revell made a few other mistakes as well, not having the entry of the skids into the fuselage at the right place for instance. I agree, should have measured that before wasting a set of skids and time on that, but it’s a bit late for that now. Anyway, I’ve made new holes in the fuselage for the skids (thus allowing me to use the standard skids and not having to bend them while still getting the correct shape) and am in the process of adding all the details to them again. More on that next time.
The stock Revell winch is also a piece of ****, nothing close to the original. Sometimes I just wonder where they get there dimensions and references from, must be a different aircraft then the one I’m trying to build?! I decided this would look awful on the finished model and got going with my own version of it. Luckily I was able to use most parts of the winch though, be it heavily altered. I cut holes in the winch itself and added a cable inside. The wiring will be made from scratch and I’ve drilled several 0.3 mm holes to achieve this. The installation itself will be mostly scratch build as well, with a few bits of the original kit on it. There’s still a lot to be done to this, but that will come in the next update as well.
For those who are actually still following this build with great interest, I post (almost daily) photos of the progress on Instagram. But if you don’t have access to this, I’ll try to add photos on a regular basis to this blog as well. So keep checking it, as I may not always post a blog entry when uploading new images.
Until next time!
Return to Previous Page
Niek Nijsen Ltd.
Comp. Reg. (UK): 13778584
VAT. Reg. (UK): 398 4757 24
info@nieknijsen.com
Copyright
Niek Nijsen Ltd. © 2008 -
All Rights Reserved
Privacy Policy | Terms of Business