
We're building again, sort of
Posted on Posted on April 08, 2021 by Niek Nijsen
If it weren’t for my social media outputs and continued stream of new episodes of Project C.A.R.™, you’d probably be wondering if I’m still alive. And rightly so, as the previous blog entry dates well over 4 months ago! That in itself is a grotesque mistake on my part and it is about time I provide you with an update on the car and the restoration progress. You might have read most of it in the newsletters of the last couple of months, but if you haven’t subscribed to those yet (shame on you, just kidding, but seriously go hit that subscribe button) you’ll find a lot of new information in the large number of words that will now follow.
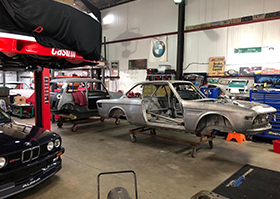
It seems we have to go back all the way to November to start this update, a month in which we made some great progress and we finally got the bodyshell back. On the other side of that great news, I fell behind with the regular blog updates and episodes on Project C.A.R.™. And although I managed to catch up with the episodes, it seems I wasn’t able to with the blog (at least until now).
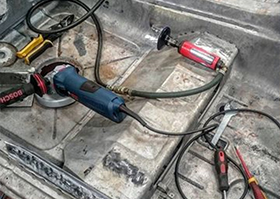
The previous blog update mentioned the return of Brünhilda after her little swim and the state she was in. So, come December I finally got started with the required work, and the first order of business was the removal of the seat frames, since they're being replaced by Sparco bucket seats. Using the angle grinder, a spot weld drill and the TIG welder to fill up the gaps, the frames were fairly easy to remove, and subsequent cuts filled. Having said that, my test session with the TIG welder near the battery tray resulted in more holes in the car than I started with. Not the best of beginnings but I did find out what settings to use for the panel thickness of the E9. Shame I didn’t try it on a piece of scrap metal (mental note for next time). Aside from that, not much else was achieved. I cut away some obsolete brackets (especially wiring loom related as this will all be new and changed) and managed to catch up on the restoration series. The rest of the month was spent on social activities (annoying Christmas holidays always come in the way of working on the car…).
At this point we’ve arrived in the new year and from what I can gather, it’s promising to be an interesting one (at least regarding the restoration of Brünhilda, I can’t speak for anything else that might happen in the world). Here’s some big news to start the year with: I’ve acquired another car to restore! Despite that, the cold managed to keep me out of the garage for most of the time, and to make matters worse it seems I’ve got a leak in the roof. The latter, which is dripping onto the interior trim panels which will need replacing now… (thankfully this was already in the planning as they were in a poor condition when I removed them). They seem to be in an okay condition still to be used as templates. Nonetheless, it’s something that’ll need sorting asap to stop any further damage from occurring.
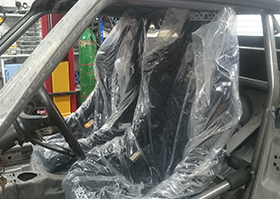
More importantly, I came to the realisation that some of the work required in order to repair the bodywork on the car is beyond my skill level and tools required. The more sensible approach here is to have this done by a pro who has done this kind of work before. And so, I was introduced to Chris and his business “Competition Classics” which specialises in E9 restorations (and race car conversions more specifically). Both of which are remarkably close to what I needed so it was a quick and easy choice to let him do this part of the process. The main reason (aside from my lacking skill) is that I want this car to be safe and therefor the welding needs to be done properly (especially that of the roll cage mounts and some of the structural panel work). Which brings us to the next step for me, prepping the car for collection. This included the installation of the cage, steering column, dashboard, seats and pedals. Be it all loosely chucked in there as Chris will make sure it’s all welded into place. I’m heading down there in the next couple of months for the test fitting of seat positions and hopefully come home with enough footage for another special. Fingers crossed. Other than that, there are a few other modifications he will be sorting for me (again all structural) so all that’s left for me to do when she’s back will be welding in brackets and mounts in order to facilitate the changes I have in mind.
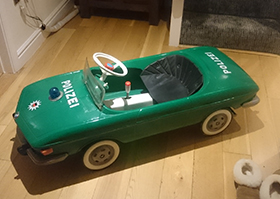
Remember where I just mentioned I acquired another car to restore (“Here’s some big news to start the year with: I’ve acquired another car to restore!”)? Well, funny enough it’s going to be a mini version of Brünhilda, a vintage BMW CSL pedal car. This will be covered in a special episode at some point in the future, but it’s proving to be a fun little project already. I’ve completely taken it apart and am currently in the process of seeing what needs doing. Basically, I’m turning it into a mini version of the real car, with matching paint and exterior details where possible. That is, once I’ve figured out how to paint polypropylene, something that’s not so easy to do apparently.
Now that we’ve covered January, it is time to move into February (I know, keep up as we’re going at race pace here). Thankfully, the weather is slowly warming up and I was able to venture into the garage a bit more. However, that didn’t last very long, as the time I have on my hands has been reduced somewhat with the arrival of my daughter right at the start (the 4th to be exact). This also resulted in me not being around for the collection of Brünhilda by Chris, but thankfully under the watchful eye of my father-in-law everything went very well, and the car was shipped off without any issues. I know you’re all thinking it and I did ask the midwife when Oliva was born, but the answer is still unclear whether she can help me in the garage from the crawling or walking phase. Although mum doesn’t seem to agree with either option, I guess I’ll have to wait a little longer before I’ve got a helper with small hands. (I’m joking, please don’t send social services to my doorstep).
Anyway, at this point the leaking roof had been fixed and the arctic conditions have finally thawed to the amount it was safe to enter the garage without full winter gear. Thankfully the only result of the water damage are the trim panels which are now beyond repair but good enough to act as a template still. Luckily, nothing else was damaged during the winter months (it was a bit of a surprise as I thought more parts would not do too well in the cold, although I have no clue as to why I thought that. Perhaps because we don’t see many classic cars on the road during winter?) That being said, I’ve definitely learned my lesson and I’ll make sure that the roof and general condition of the garage is properly checked before the next winter.
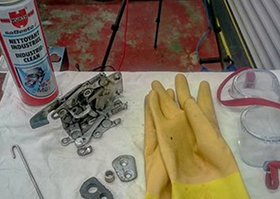
That leaves us with an empty garage and not a lot left to work on (or at least so I thought, until I saw all the parts that have come out of the car during the last year). First order of business was the long put-off cleaning and repairing of some parts. I hoped that a good rinse in degreaser would do the trick, but it turned out it was going to take a lot more to clean 45 years of dirt – to the point of using aqua- and sandblasting on some of the parts (that and some amazing product called Jet fuel)! I’ve mainly focussed on internal parts from the doors, including the window mechanism, rails, and door locks. These are now all bright and clean again and some of them have even been powder coated. Okay, that sounds very amazing, but the powder coating included only two brackets that are mounting the window rail to the inside of the doors. I’m sure there will be more powdering going on in the not-too-distant future. Sadly, the rear suspension bits were too big to do myself, so I’ll have to drop these off somewhere to be done. I’m hoping they can then go along with the bodyshell for anti-rust coating before the whole lot gets powder coated. I’ll do some research and will update you on the plans when possible.
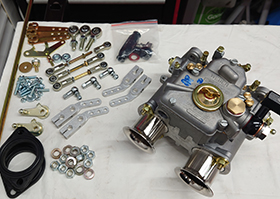
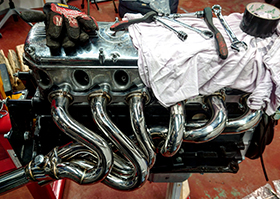
The main feature still left in the garage is the beautiful straight 6 engine that’s patiently waiting to be worked on. Yes, you’ve guessed it right, I’ve started installing the Weber carburettors, all three of them. They’re big pieces of equipment and require a decent amount of work to get right, but all of it will be worth it in the end. For now, it’s just the mechanical part of the installation, as the fine-tuning and adjustment of the levers will be done once the engine is back in the car. Unfortunately, despite the reasonable amount of work it took, I’ll have to take them off then engine again as the new gaskets were still on order. Hopefully, I’ll be able to remove them as one (or undo the crossbar and do them one-by-one). I’m sure it will all make better sense once you’ve watched episode 21 which covers this in detail.
A bigger problem with converting the engine to a triple carburettor setup, is the fact that you’ll get into trouble with the thermostat housing. This requires either moving or modifying, both of which are costly and a fair amount of work to achieve. After a bit of research, I was directed to a company in Australia who make spacers for this exact issue; one was ordered and shall be installed next time I’m back in the workshop. More on this in a future episode in Project C.A.R.™ (and the blog here if I don’t forget as usual).
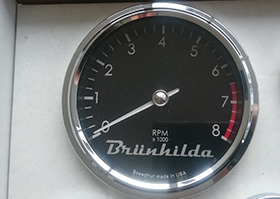
Last but not least, I’ve been doing some shopping (again / still, the answer depends on whom you ask). The first delivery included the new front CSL style airdam, upgraded CSL springs and a rear anti-roll bar (which somehow is missing from mine – I don’t’ think it was ever installed in the first place). Next up was a big delivery containing new rubbers, repair sets, fasteners, bolts, nuts, and the long-needed gaskets. Only problem was the new import rates since Brexit made it a bit costly to ship to the UK, instead they’re now laying on the kitchen table at my parents’ place in The Netherlands (or at least they were when dad sent me the photo, I’m pretty certain he’s had to clear the table since). The gaskets will be sent across by post so I can continue work on the engine, but the rest of the parts will follow in the coming months when needed or when they’re allowed to visit us again. Last but most certainly not least, I received the new instrument gauges from the USA by a company called SpeedHut. These are customised to my requirements to a certain extend and have been featured in the latest special episode on Project C.A.R.™.
Bugger, I almost forgot the most boring part of this update! I’ve been working on the new wiring system and slowly converting this into a diagram using some sophisticated software (probably not that sophisticated, I just haven’t figured out yet how to use it properly). Hopefully, this will aid in the future when it comes to making and maintaining the wiring loom, but for now it’s a pretty boring and tedious job to do. Oh well, all worth it in the end.
And that does bring us to the end of this update containing 2103 words - I told you it was lengthy. If I’ve managed to keep you entertained for this long, I’d like to thank you for your continued support and interest in the restoration and hope to see you all again at the next instalment, either on the blog here or on the various social media outlets covering Project C.A.R.™. And if you haven’t subscribed yet, go do that now! (Shame on you!) See you all next time!
Return to Previous Page

Niek Nijsen Ltd.
Comp. Reg. (UK): 13778584
VAT. Reg. (UK): 398 4757 24
info@nieknijsen.com
Copyright
Niek Nijsen Ltd. © 2008 -
All Rights Reserved
Privacy Policy | Terms of Business