
Back in business
Posted on November 20, 2020 by Niek Nijsen
Wait, has it really been three months since I last wrote something here?! Has it really been three months of just newsletters to keep you updated on what’s going on?! My sincerest apologies, I’ve completely lost track of what I’m doing with my time. At least I can say all the work I’ve been putting into the house is almost finished, so that should mean more time in the garage soon! All I can offer you now, is one massive update on Brünhilda’s restoration progress. So, you better get you’re drink ready, clear your schedule for the next hour and grab a comfy seat and perhaps be like me wishing you knew how to “speed read” and be done with it in just a few minutes.
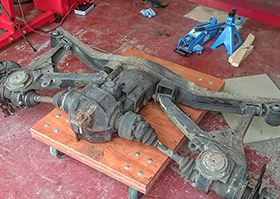
I noticed that I completely forgot about the rear subframe in the previous post. After I got the engine removed and the front bits taken off, attention focussed on the rear part of the car again. Mind you, there’s not a lot left to choose from at this point, it’s either the rear end or the windscreens. And the latter I’m holding off for as long as I can. Anyway, the rear subframe is held in place by a few bolts on support brackets and a largen one that also mounts the rear diff. In general, this would allow for an easy and quick removal by dropping it like I did with the engine up front. In general… Although pretty straightforward on paper, it turned out to be a bit more complicated in rear life. The problem was that my lift arms are partially covering the bolts that hold the subframe support brackets in place, as they hide just behind the jack points. What made things even worse is the fact that the car was now in a stage that moving her is no longer an option. Eventually, I can up with an idea to put the jack underneath the diff, allowing the car to be suspended in the air far enough to reposition the rear arms. I did end up using a piece of wood to support he body a bit better on a less fragile part, but other than that it was pretty easy. Now that I finally had access to the bolts, I was able to remove them. Yet I almost forgot to undo the top mount of the shock absorbers. Wait, not almost, I simply forgot to do them. Bit embarrassing when I tried to lift the car up and the whole frame went upwards with it. Luckily, I only raised it very slightly before I figured out what was going on and the nuts were quickly removed at the top of said shock absorbers. At this point the subframe was completely loose from the bodyshell and it was finally ready to be separated from the body. The wooden cart previously used for the engine was placed underneath and thankfully the subframe stayed behind this time as I raised the car. I subsequently repositioned the arms back to support the car at the jack points as before.
Other than the windscreens, the only items that I could remove at this point were the bonnet and boot. I ended up not filming any of this for the Project C.A.R.™ series as they’re pretty simple to remove. All it takes are a few bolts that hold the hinges attached to the car and once they’re undone the whole thing lifts off. Whereas the boot is not too heavy and can be done by one person, the bonnet most certainly required an extra hand. Unless you’re strong like “The Rock”, who recently removed his own steel driveway gate after an electrical failure while desperate to get to work. Good thing I don’t have a gate.
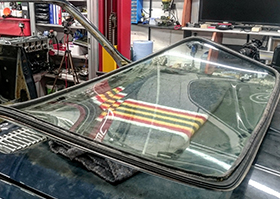
Anyway, back to Brünhilda. I could no longer postpone the removal of the dreaded windscreens. Apparently, it’s quite a nightmare to get these removed and instructions or suggestions are minimal and far from helpful. I knew by now that they both come out with the rubbers and chrome strip attached, but I hadn’t figured out how to simply do this and without breaking the lot. I needed some form of a wedge I could push between the rubber and the car body and then “flip” the rubber over the edge to pop it out. Sometimes, after long and hard thinking, you end up with an idea that’s so simple, yet astonishingly beautiful. Yes, you guest it correctly, I ended up using wooden clothes pegs, the ones you use to hang up your laundry. I separated both halves of the pegs and used the thing long end to wedge in between the rubber and body from the inside of the car. Once I had a few of these in and thus creating a bit of a gap, I was able to insert another peg and “flip” it, thereby lifting the rubber over the metal edge and freeing the window for what appears to be the first time since it was placed there in 1974. What surprised me the most was the condition and quality of both the rubber and metal work surrounding it. I might even be able to clean and reuse it, which would be a huge cost saver. Fingers crossed. Before I forget, you’ll be pleased to know I recorded this in full detail and will probably dedicate an entire episode to this, as it’s something I think will be very helpful to fellow classic car restorers with a similar setup.
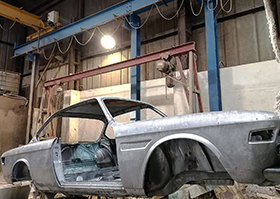
I mentioned, or at least I think it did in my newsletters, that we were still on schedule for the chem dip. She was collected in early September and as Bill Withers so famously sang in the early 70’s, “there ain’t no sunshine when she’s gone”. Each time I walked into the garage it felt like there’s something missing. Alright smartass, obviously there is. What made things worse was that I had no clue what to expect coming back; Will there be something resembling a car shell, or will it be a bucket with some metal flakes in it…? Find out the results after the break.
While the car was being stripped by multiple dips in a chem bath, I was still left with the rear subframe laying on the floor of the garage, waiting to be taken apart before stored on the shelves. For some reason this turned into almost desperation, as I couldn’t seem to get them to move at all. It also doesn’t help that the BMW workshop manual only does this while the wheels and brakes are still attached and working, something that clearly isn’t an option for me at this point. It was time again to put my brain to work and come up with a solution. My first attempt using a standard socket wrench went pretty bad, to the point that I got my hands stuck between the frame and the cart multiple times. Battered and bruised I soldiered on, but the final drive shafts kept on rotating every time I put pressure on the bolts. Clearly, this wasn’t working. A suggestion came from a colleague at work, who in his spare time restores Mercedes G-Wagons. He kindly lent me his impact drill with suitable sockets. Blimey, this made quick work of those frustrating bolts. In hindsight I could’ve done this myself as I now realised, I have an impact drill as part of my compressed air tool collection, but that would mean I need to get my compressor working first. Anyway, the borrowed impact drill made quick work of the bolt removal process and the only thing I remember vividly is how dirty this job came to be. A lot of grease, oil (assuming from the diff itself somehow), dirt and other “muck” that’s been collecting there for the last 45 years. Heck, it took me longer to clean the mess up afterwards than it took me to remove the bolts themselves, including earlier attempts. Now that the final drive shafts were finally separated from the subframe, I could continue by removing the standard CS diff, which will be replaced by a limited slip version (3.45 ratio for those who are keen to know). Next up where the semi-trailing arms, which are the triangle-shaped metal “arms” that hold the wheel in place and allow for the movement of the shock absorbers which are mounted on top of them. These needed a bit of motivation to come off as well but were pretty straightforward once the bolts were out. Nothing you can’t solve with some positive motivation though a massive hammer. As I lifted each part to their storage location in the garage, it felt like half the forest came falling out, with leaves, twigs, nuts and dirt all dropping onto the floor. Either the mice that lived inside the rear seats had a holiday home as well, or it was the winter storage for some of the local squirrels. Either way, the garage was once a gain a big mess.
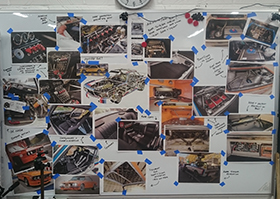
However, with the garage empty, this was the perfect time to do some long-awaited upgrading and reorganising of the garage, as this would probably be the only time I could before the car would be back. Most of this is to make better use of the space available and some in prep for Brünhilda’s return, as I’ll be needing a system that stores the boot lid and bonnet out of the way while I’m making the necessary modifications to both ends of the car. As such, I’ve installed a hoist system above the door where they’ll be stored for the time being. Little did I know the bonnet would be too heavy to lift like this and the whole system would need some serious redesigning by an engineer (my dad) before it could be used. Oh well, can’t win them all. I also put the whiteboard to good use by printing all the photos of cars I like and stuck them on there. Hopefully this way it’s easier for me to convey my ideas to someone than trying to make sense of my garbled mind. Time will tell.
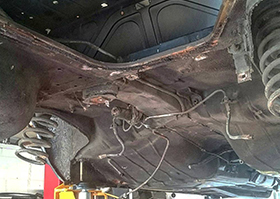
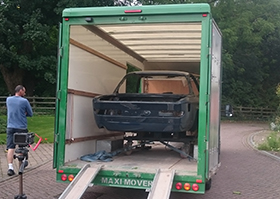
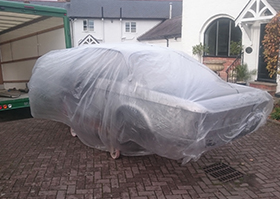
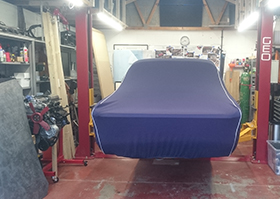
At this point there was literally nothing left to do until she returned, aside from cleaning a lot of the parts I previously removed, but I’m putting this off for as long as I can. However, mid-October I finally got the call that Brünhilda was completely clean and ready to return home. She was delivered that same day and is now back home, temporarily stored under her winter blanket, which I’ll remove when I start on the repair works. That being said, I had a quick look at her and although the car itself seems to be in a good condition overall (especially for an E9), there are some very poor repairs visible that have been done by the previous owner(s), which will require some serious attention.
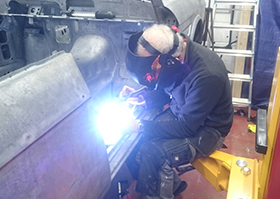
We now arrived in November and I’ve got some help in the garage. After many delays, my parents have finally been able to come across to the UK for a few weeks. Although most of this time was spent working on other improvements in the house, the last few days we’ve been able to work on the car. The first step was to prepare the garage for all the dust that appears during welding and grinding of metal. We ended up covering both sides of the garage with large sheets of tarpaulin, which still allow access to the items behind, be it the storage shelves or my workbench. Next, we relocated a few items so that there was space in the centre of the garage for the new TIG welder (my old one, which was second-hand, never worked apparently, as three different repair centres confirmed). Initially we struggled a bit with the set-up, but eventually got it working. Lastly, we moved the boot and bonnet lids to their storage space above the door, the hoist system needing some rethinking before it eventually worked. But at least we’re now left with a bodyshell that’s accessible and ready to be worked on.
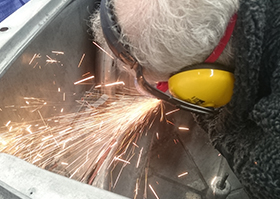
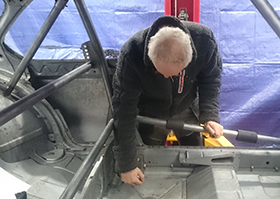
It wasn’t long before work started as dad was pretty eager to get his hands on Brünhilda (is it me or does that sound wrong…?) and the first step was to cut a big hole in the boot in order to fit the new “box” that will end up housing the new fuel tank, mainly because the bloody box is in our way now. A template was made from thick paper card and marked in the boot. Out came the angle grinder and off he went, making short work of the spare wheel section that’s now no longer part of the car. As this went a bit faster than anticipated, we figured we’d try to fit the new roll cage. This turned out to be a bit of a puzzle to get it in but eventually we got it in place, only to find out that the rear section was different than what we were led to believe it would be like. Instead of going through the rear shelf, it is mounted to the wheel arches, thus going through the rear seats. Something that doesn’t work for my intended use as a road car, so I’m currently in touch with the manufacturer to try and solve the issue. Anyway, dad figured the front section fitted nicely and began cutting holes in the car where it mounts to the bodyshell.
And other than a bit of practice welding on a scrap piece of metal, that’s pretty much were we are now. Unfortunately, I’m at work for most of this month, so I doubt there will be a lot of work done to the car either. Which also means I’ve fallen behind on the Project C.A.R.™ episodes. I’ve missed the previous bi-weekly deadline and it seems I won’t be making the next one either at the end of this month. I’ll do my best to get the next instalment online as quick as I can, but you might have to wait a little longer than usual. That being said, I did upload quite a few episodes over the last few months since the last update, so if you haven’t already, there’s plenty of quality footage to watch. These include the side windows, doors, brakes, wheel hub assemblies, engine removal and gearbox separation.
Thank goodness you’ve made it to the end of this update, I told you it would be a long one. Thank you for sticking with me on this project and hopefully I’ll have another (be it a somewhat shorter) update for your soon. See you then!
Return to Previous Page
Niek Nijsen Ltd.
Comp. Reg. (UK): 13778584
VAT. Reg. (UK): 398 4757 24
info@nieknijsen.com
Copyright
Niek Nijsen Ltd. © 2008 -
All Rights Reserved
Privacy Policy | Terms of Business