
A divorce is on the horizon
Posted on June 30, 2020 by Niek Nijsen
In the previous update we started work in the engine bay. The original Zenith twin carburettors were removed along with the matching inlet manifolds. In this update, we’ll continue with the engine bay work and separate the engine from the body.
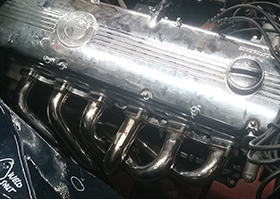
The first new part that arrived was the exhaust manifold by Schmiedmann in Denmark. I unpacked the beautifully crafted and shiny headers from their box and went straight to test fitting them. It took a few attempts, but eventually I got them to fit nicely. I had to remove the hoses between the gearbox and radiator but after that it was pretty much straight forward.
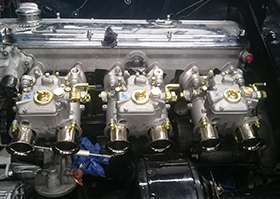
The following day another package arrived, which contained the new triple Weber carburettors. Since I already removed the old carbs, I was hoping this would be a straight fit as well. Unfortunately, this wasn’t the case. In order to get the front one on, the thermostat housing had to come off. Turns out this will need some modification in order to fit alongside the new inlet. Aside from that, I now also have a water line that’s no longer of any use, as the new carbs aren’t water cooled like the old ones. Something I’ll have to sort out in the future. At least the rear carb went on without any problems, but when fitting the middle one it turned out that there’s only 2 mm space between the air inlet and the brake booster. Once again, I had to come up with a way to get it all to fit as I’ll be needing more space for the air inlets to function. Eventually I decided that the best way would be to remove the oil filter that’s attached to the engine, which creates enough space to bring the booster forward, leaving enough space for the inlets. I’ll get into more detail regarding this when I get to work on the engine to relocate the filter.
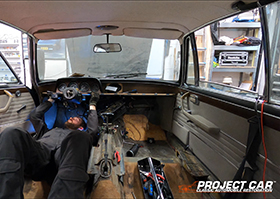
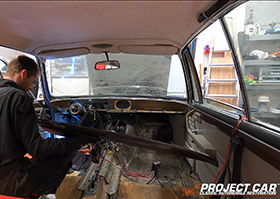
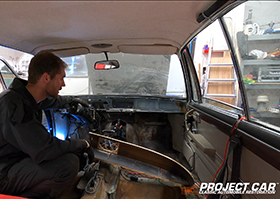
Then came the dreaded job of removing the old sound insulation, a horrible if you ask me. The old material is very sticky and brittle, so in order to remove it I’ve been using a heat gun to soften the material and glue while shoving a plaster knife underneath it, trying to separate it from the bodywork. A slow and time-consuming process… At the moment I’ve removed both the front footwells, the transmission tunnel and bulkhead. However, the rear seats still need doing, as well as the doors.
Away from the car I’ve been working on some more episodes for you to enjoy. During this month I’ve uploaded part 1 and 2 of the dashboard removal. In these episodes you get to join me while I remove the entire dash without taking out the windscreen first (something that’s normally not done). It takes quite a bit of work and its somewhat of a puzzle, but eventually I got it all out. Worth a watch if you’re planning on restoring/removing your dash.
Back to the lower half of the car, this time the front and rear brakes. The left rear has been playing up a lot in that it’s pretty much locked in place. I suspected the handbrake to be the cause of the issue but couldn’t get to it as it requires me to take of the brake disk. This turned out to be more of an issue than anticipated, since it wouldn’t come off the normal way by gently pulling it. I ended up using a bearing removal tool (not sure what the official name is) and slowly pulled the disk off. This worked and I finally had a good view of the handbrake parts, all of which will be replaced. The bits were removed, and work shifted to the other side, which luckily came off without any problems.
I shifted my attention to the front where I had the additional work of removing the brake callipers as well, which had been installed during the previous restoration work. With a bit of help from the workshop manual I figured out how the front wheel hubs worked and slowly got the whole assembly dismantled. Everything was labelled and boxed before putting it away.
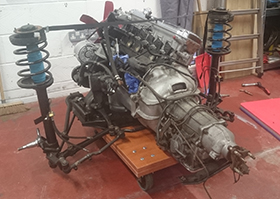
Now that most of the work underneath the car was done, it was time to separate the engine from the body. Now, normally you’d do this with an engine crane and lift it up through the top of the car. This would require me to remove the bonnet, find a crane and push the car back far enough to get access to the front. Something that wasn’t going to happen since I just removed the wheels…
I figured that I would be possible to reverse the installation method they use in the factory; in that I would be able to remove the engine by removing the entire subframe assembly. This would then stay behind as I raise the bodywork using the lift. My homemade cart was placed underneath the subframe in order to move it around once extracted before I undid the top of the suspension. This was required as it would stay behind with the subframe, allowing easy removal afterwards. Be aware that if you do this yourself, that the suspension will fall over as soon as the body is raised far enough. Using a strap to keep them upright will stop this from happening. I’ll explain this better in the relevant episode which will be available in the near future. Anyway, the car was lowered far enough for the subframe to rest on the cart and I began the separation process by undoing the rear gearbox mount. To stop if from falling down, I placed a strop around the backend of the transmission which was held in place with a piece of wood inside the car. The bolts that attach the subframe to the body were undone and the moment of separation arrived. I slowly raised the lift, only to see the gearbox going up along with it as well! You guessed it, I forgot to remove the strap that held the gearbox in place! The car was quickly lowered again and once the strap was removed a new attempt was made. This time it all went well, and the engine and body finally came apart from each other. A huge milestone in the restoration process.
I found a neighbour in the village that has an engine crane and he was willing to let me borrow it. With a crane I could now remove the automatic gearbox from the engine as I’ll be replacing this with a manual 5-speed. I’ll admit, I was pretty naïve thinking it would be a quick job by simply removing a few bolts… Yeah no, not really. It turns out that the automatic gearbox requires a bit more work. I had to remove an additional 4 bolts on the “inside” of the gearbox. I know, that sounds weird and impossible. However, the bolts can be accessed in a particular position where there’s a small “cutout” in the engine block. Anyway, in order to position these bolts in the opening, I had to rotate the crankshaft. Turns out I need a 36mm socket to do that… Despite placing a quick order for the missing tools, delivery took a bit longer, so work was halted for now. Once the tools arrive, I’ll continue work, but I’m afraid that’s it for this update.
As always, thank you for following and your feedback, love to hear your thoughts on the progress and the project in general! Don’t forget to watch the latest episodes and subscribe to the channels. See you next time.
Return to Previous Page
Niek Nijsen Ltd.
Comp. Reg. (UK): 13778584
VAT. Reg. (UK): 398 4757 24
info@nieknijsen.com
Copyright
Niek Nijsen Ltd. © 2008 -
All Rights Reserved
Privacy Policy | Terms of Business