Update 7: Time For Some Colour | March 22 - April 01
Posted on April 01, 2016 by Niek Nijsen
I’d like to begin with thanking everyone for your kind comments and tips, you’re really helping me to stay motivated throughout this project. Let’s get going with this update.
Thanks to the service of the Royal Mail, the F-16 has arrived safely at my home in the Shetlands. After I unpacked everything I did a dry fit with the stand (which stays “hidden” until the final reveal) and made sure the model and parts were ready to be prepared for paint.
I started by removing the seam from the cockpit window, as this would create fine dust, which would hinder me during painting. With Phil’s video in the background, I worked my way through various sanders until the seam was gone and a crisp canopy was left.
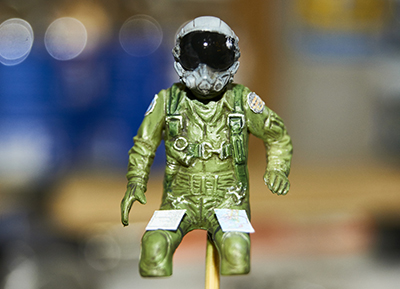
The next job would be that of prepping the pilot and getting him ready to be fitted inside the plane. He was washed before being sprayed with Vallejo Air 71.005, camo green. I must say I don’t really seem to get on that well with the Vallejo paints, and decided to sell them and swap to LifeColor instead (which are being used later for the jet itself). Once the green was dry, I sprayed his helmet and brush painted his visor. A bit of weathering and tonal variations were added next. I used a metallic pencil to do the seatbelt clasps. The kneeboard and patches were adjusted to scale before printed and glued on with PVA. The pilot was then placed in the cockpit, glued in place and the canopy added.
Time to start the primer stage. I masked the canopy using the masking sheet that’s provided with the kit, although it needed a bit of fine-tuning with flexible tape to get the right contours. The model was given a quick wash with a wipe and some Tamiya thinner before primed. Since I was still waiting on my new airbrush, I decided to use the last bit of Tamiya’s spray can primer. It’s great stuff, but it does paint the rest of your house as well at the same time.
With the primer drying, I moved to the exhaust and painted this with a mix of “stainless steel” and “dark iron” buffable paints. I used a micro cloth (normally used to clean sunglasses) to buff it up. With the new look a bit too shiny, I went over it with the dark dirt wash, which toned it all down a bit and made it look more like the real thing. The inside was done with the wash as well, but wasn’t removed once dry. It gives that nice burned effect to it.
Now that the primer was dry, I began the pre-shading process using Vallejo dark grey, lacking anything better. The paint went on horrible and gave me loads of overspray.
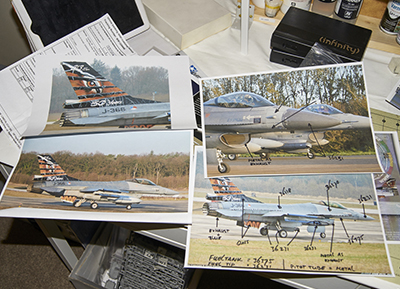
Finally I was time to start with the actual colours for the jet. I’ve printed out a few photos of the real aircraft and marked the colours and various other bits with a marker pen for easy reference.
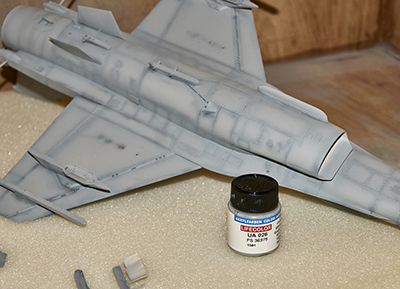
The nose was painted first as this would be the easiest part to mask. The same colour (FS36231) was used for the LANTIRN and belly pod. I will be using LifeColor paints for the rest of the project. The lower half was painted with FS36375 in a thin layer to get the pre-shading to come through. This will later help me with the tonal variations and heavy weathering of this aircraft. The top would be sprayed with 2 colours, the front with FS36270 and the darker rear section with FS36118, again in thin layers. The tail was painted as well, but will receive a white coat before decals go on. I sanded and polished it to achieve the smoothest surface as possible.
And that’s where we are now. All the relevant bits have been painted, although the weapons still need to be done (waiting on a few colours to arrive). More on that on the next update! Thanks for watching and your comments!
Return to Previous Page

Niek Nijsen Ltd.
Comp. Reg. (UK): 13778584
VAT. Reg. (UK): 398 4757 24
info@nieknijsen.com
Copyright
Niek Nijsen Ltd. © 2008 -
All Rights Reserved
Privacy Policy | Terms of Business