Armed to the Teeth
Posted on July 08, 2022 by Niek Nijsen
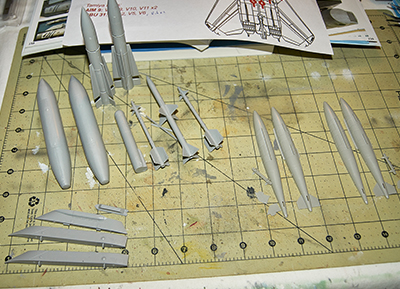
For a multi-year project, it seems the first update has arrived somewhat early. Don’t be fooled though, as I’m sure there’s still plenty left to do in order to stretch this out for a lot longer. It just so happens that I’ve started with a different sub-subject than usual. Instead of starting with the cockpit and following the instruction manual in the correct order from there, I went straight to the last page and began assembling the weapons. Why? Well, because I wanted an easy start on this project, something that would get me motivated and not ready to give up straight away. Also, it turns out that during my previous “dabbling” with this kit, I already assembled a few of the missiles.
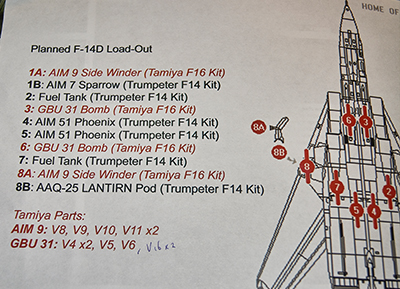
Before I started with putting together all the weapons, I needed to decide which ones I wanted to use, since Trumpeter provides too many to be mounted to the bird when she’s finished. This that left me with two options. I could either assemble the exact amount I needed to fill the aircraft, or I could assemble all of them and have a few laying around in the final diorama, perhaps on a supply trolley? Add to this the weapons I have kept from the F-16 I did a few years ago, and all of a sudden, I had a bit of a dilemma on my hands. My load-out decision was eventually based on the following principle: “It may not be a 100% realistic load-out, but it looks good and makes the model more interesting”. The result, a mix of Trumpeter and Tamiya missiles, bombs, and pods, giving me the following weapon load (for the specialists among us):
- 2x AIM 9 Side Winder missiles
- 1x AIM 7 Sparrow missile
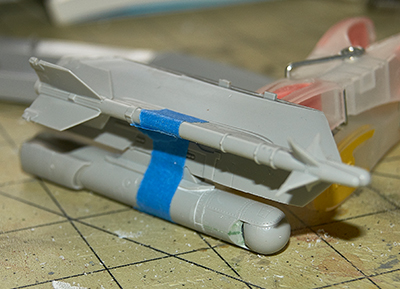
- 2x AIM 54 Phoenix missiles
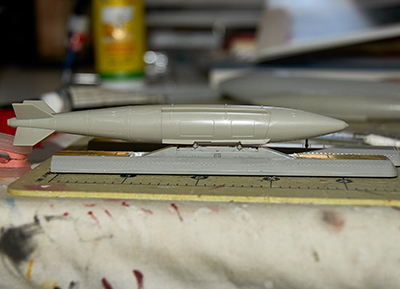
- 2x GBU 31 bombs
- 2x Fuel tanks
- 1x LANTIRN pod
Here’s the odd thing about my load-out. Despite Trumpeter not providing any bombs in the kit (I’ve stolen these from the F-16), they do provide all the correct mountings for them; They’re not mentioned anywhere in the instructions other than in the “parts not used” list. More on this in a bit. The rest is straight forward, or at least so I thought…
For this project, I’m using the brilliant reference book “Uncovering the F-14” by DACO Publications. The photos he has taking during one of his tours onboard a US aircraft carrier are phenomenal. This does introduce some issues for the model, in that Trumpeter made quite a few mistakes in their product. Normally you’d probably ignore these, as they’re mostly small or insignificant, and most times I would have. However, since this is one of my super builds, I can’t get myself to ignore them this time. Let’s start with an example. The LANTIRN pod was my first point of call when I began assembling the chosen weapons. As soon as I compared the kit parts to the reference photos, I noticed that if you followed the instructions, the pod would be mounted up-side-down and the vent cover would be on the wrong side, too. Step one would be to drill a new vent hole so I could install the PE mesh cover correctly and step two would be to fill all the incorrect holes with putty. Once they were all sanded down, I closed all the gaps that originated from assembling the various parts and added the PE replacement parts. But wait, there’s more! You’d hope that this is the end of mistakes on this part. Thank goodness we’re not let down and another mistake has been thrown into the mix. The pylon on which the pod is mounted is also incorrect. Thankfully this is an easy mistake to rectify, as all you have to do is swap the left and right ones in the instruction manual. The difference is subtle, but if you look closely, you can see the different “structure” on the pylon. All that’s left to do on this now, is modifying the lens to look more realistic and less plastic.
Enough on the LANTIRN pod, let’s move on to some real weapons! The GBU-31 bombs are taken from the Tamiya F-16 kit, which means that they’re accurate and easy to assemble. Aside from a bit of seam-sanding once assembled, there wasn’t a lot else to do on these before I was happy with them (I’ll add the fire protective coating later). That can’t be said for the weapon pallets, sadly. As I mentioned earlier in the introduction, for some reason Trumpeter decided that their D-model would have all the parts needed (aside from the physical bombs) but kept them from the instructions and omitted them from being used. After carefully studying the reference photos, I came across the mounting racks by pure chance when I went through the sprues trying to see what I might be able to use to alter them. Granted that once I found these, the main weapon pallet that sits under the plane’s belly had to be extensively modified to fit them. From what I can gather (without looking at the instructions by Trumpeter from their other variant) I suspect the bomb racks would simply be glued straight onto the weapon pallet. Looking at photos, this would mean introducing another mistake to the model. Bugger, what to do now? There’s not a lot else I can do beside getting out a fine razor saw and start cutting up the pallets. Before I did, I had to make a final choice in my weapon load-out; Did I want my bombs to be mounted in front or behind the Phoenix missiles? I settled down to have them in the back, mainly because the front ones have these really cool looking fairings specially designed for the Phoenix missiles which I wanted to keep. Once I cut out the middle section, I cut the PE part that needed to be added in the same place and glued the remainder underneath to create a support for the bomb mount. Looking at photos, they appear to be seated “inside” the weapon pallet. A small amount of filler was used to make it look a bit better and the wiring was made with some copper wire and filler to represent the connectors. It looks a bit messy in the photos and in all honesty, I might elect to redo this bit as I’m not too happy with them. I’m going to try something else on the second bomb rack which if I’m happy with it, I’ll also do with the first. More on that in the next update.
The Phoenix missiles were good enough straight from the box and all I did was add the PE rings to the back end of them. Same for the AIM 9 Side Winder, which was enhanced with a PE ring, too. The only items from the load-out that didn’t have anything done to them were the fuel tanks, as I decided that the detail was good enough to not bother with the PE part for them.
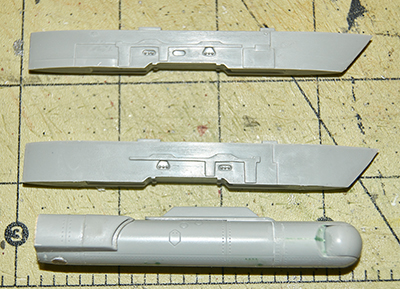
Are we all still there? I know it’s a lengthy update but you’re getting close to the end now! Since I was left with just the AIM 7 missiles at this point, I had to make a choice on whether to use the Trumpeter or Tamiya versions. I assembled one of each and laid them next to each other alongside the reference book. Funny thing is, that although you’d probably expect me to choose the Tamiya one, I stuck with Trumpeter as I feel this one looked closer to the real thing. That, plus the fact that the “remove before flight” cover caps I’ll be adding fitted better to Trumpy’s version. Weirdly enough, there is no PE to enhance anything on them and so I simply assembled the second one and put them in the box for later.
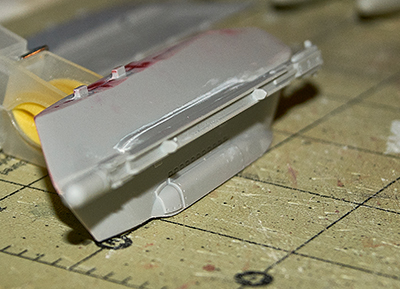
This can’t be said for the pylons the above missiles (and LANTIRN pod) will be mounted to. For some reason the engineers at Trumpeter decided to make these out of two halves, which is fine, but then went for the most impractical way of fitting the two halves together. They don’t line up nicely at all and you’re left with large gaps all around, no matter how much sanding and dry fitting you do. In the end I avoided more frustration and just glued the halves together, aware of the bizarre amount of filler and sanding I would need to get it all looking correct. So far, I’ve only done one of these pylons, the right-hand-side still needs filler and sanding.
You’ll be pleased to know that I’ll cover the rest in the next update. For now, let’s all take a well-deserved breather, knowing you’ve reached the end of this post. As always, thank you for following and I hope to see you all next time!
Return to Previous Page

Niek Nijsen Ltd.
Comp. Reg. (UK): 13778584
VAT. Reg. (UK): 398 4757 24
info@nieknijsen.com
Copyright
Niek Nijsen Ltd. © 2008 -
All Rights Reserved
Privacy Policy | Terms of Business