
She's back!
Posted on March 23, 2022 by Niek Nijsen
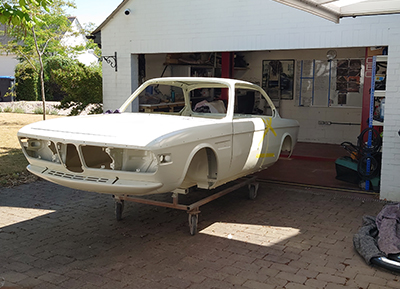
She’s back! I know, it’s been a long time coming and yes, I can finally say those three little words. She is back! Maybe not yet in her final colours, but at least in primer and ready for me to start working on again. I can’t believe what a moment this has been, the anticipation, the wait, the excitement. Let’s just say I’m very happy and eager to get started! The list of jobs is long before she has to go back for paint, so it’s best we get going. However, since it’s been almost 6 months since the last update, let’s have a quick recap before getting on with the latest updates – time to get comfy.
In the May update I spoke in length about the engine and the upgrades/modifications I’m doing. Since then, I’ve completed the outstanding items such as the choke cable and gaskets that we had made. A few remaining updates internally are still on my wish list, but these won’t be implemented until further in the future - mainly because of the extensive expenses involved and I’d like to get the car driving first to make sure it all works. Along wit this, I’m looking at upgrading the starter motor and alternator, especially since the latter might be insufficient for all the extra items it’s going to power. More on that another time – I have to do more research first – and any suggestions are more than welcome.
The rear subframe hasn’t received any further attention either, more so because I completely forgot to have the remaining parts cleaned and treated. Yeah good thinking Niek about having the main frame blasted and coated, but what about all the other parts you’re supposedly bolting back onto them? You know, those things called drive shafts, wheel hubs, suspension… You get my drift, and until I have these bits sorted out, the rear frame is still wrapped up in bubble wrap. Hey, at least you’ve got an interesting update waiting for you at some point in the future. Lucky you!
Same goes for the window assemblies, although these are mostly completed and ready to be assembled. I just haven’t got round to them yet, as my focus is currently on other areas in the car. More updates for you, double lucky!
Lastly, I mentioned the actual body shell. She’s been re-dipped, coated, and primed. The only outstanding step would be the underbody coating, but as the nation is in short supply of the materials needed, we elected to postpone the coating until I’ve finished drilling holes in a perfectly restored bodyshell. Don’t ask, it’s a long story. Oh, what the heck, you’ve got time, right?
Now that the massive cliff hanger from the previous update has been uncovered, it’s time to get on with the work I’ve since done. You may have already seen the latest episode in the Project C.A.R. series (more on that later) in which I give a detailed tour of the car and all the mods the experts at Competition Classics have implemented on my behalf. I could write an entire update on this alone, so instead I’m going go link the actual episode here.
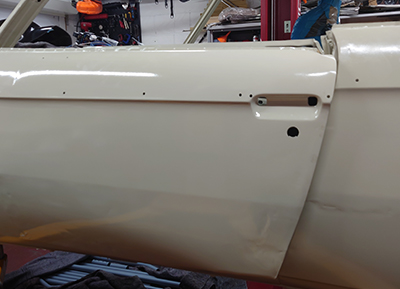
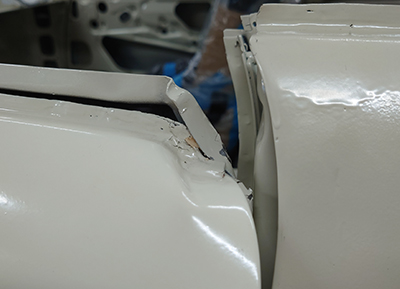
Where to begin now that she’s back in my garage. How about we start by crushing a door so it can go back to the workshop? Yeah, that sounds like a good start indeed. Let me explain.
For some bizarre reason, I left the door open. I still don’t know why I did this, probably because I’d just jumped out and needed to lift the car up. Anyway, the left door was left open, and I started lifting the car up. Since the boot was open I was especially focussing on this area. Add to this the LED light bar that’s right above my head and you can slowly start to see the holes lining up. The first indication was a slight crushing noise. I instantly stopped the upward motion and focussed on the rear of the car: nothing. The front perhaps since I’ve just hung up the front bumper there. Nothing either. Perhaps it was the lift since it hasn’t been used in the last 19 months? Little did I know that the problem was right above my head. I pressed the “up” button and instantly let go again as the cracking noise returned. Only this time it was obvious it was coming from above my head. To my horror, I noticed the door… it had impacted with the roof structure by less than 6mm! S***, what to do now? I know, lower the lift obviously! Press the “down” button. What the heck?! It keeps going up! More crushing noises and by now the door is touching the lift arms as well with the underside! I completely forgot that in order for the lift to lower itself of the locks, it has to go up another inch… Oh crap, now what? I’ve gone up another centimetre since the impact, surely if I press the button to go down again it should go by now? No, it keeps going up. Turns out that every time I let go of the button, it “resets” itself and needs to go up another inch. Oh man, this isn’t good! Quick, call the technical support of the company that supplied the lift. That was an embarrassing phone call, but they were able to explain to me how to override the system. Using clamps to “unlock” the system I started unwinding the hydraulic vent screw. Slowly, the lift started coming down, while the door continued to make nauseating noises. Thank goodness the door was only bolted in place hand-tight – instead of damaging and twisting the A-pillar mounting points, it had rotated around them. This meant that the shell was still intact and undamaged, contrary to the door itself – that’s gone back to the workshop the next day to be repaired. An expensive mistake, but thankfully no bodily harm or irreparable damage. On a positive note, at least it’s a lot easier to get in and out of the car without the door now :)
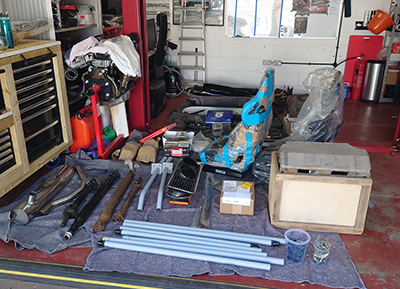
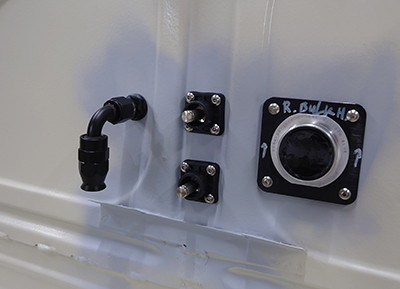
Okay, with all that door-crushing excitement now laid to rest, I was desperate to get working on the long list I need to complete before painting can be done. The main focus will be drilling all the required holes for bulkhead connectors, fuel lines, wiring, fixing points, fire extinguisher, and more. From the beginning, I wanted to run all of these through the rear bulkhead in-between the rear seats. The armrest is perfect for this, as it leaves a large open space behind it when in the up position. Plus, when I fold it down, it will provide fantastic access to all these connectors. Granted, it will require a bit of re-shaping, but you shouldn’t notice anything in the final appearance of the rear seats.
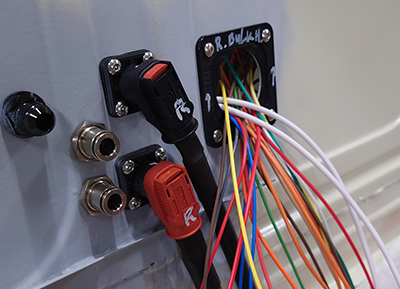
Anyway, the templates for the various connectors were stuck to the rear bulkhead and I commenced the drilling. A nerve-racking experience to say the least, especially the first few holes. However, once it got in the swing of things, I was starting to make quick work of the job. All I can say is it’s worth spending a few quid on quality drill bits. The rear bulkhead now has holes to fit the wiring, fuel line, battery cables, and fire extinguisher system. Since I’ve now damaged both the e-coat and primer, I was also given a can of primer by the painter to stop the bare metal it from rusting and to ensure it was still compatible with the final paint he’ll be using. Not to worry, all damage will be re-covered in primer before body shaping will take place (you know, that dirty dusty job of applying filler and sanding it all off again). I also modified the two brackets that hold the armrest in place in order to allow all the wires and pipes to pass through. Fantastic, the rear bulkhead is now done, and I can install the connectors.
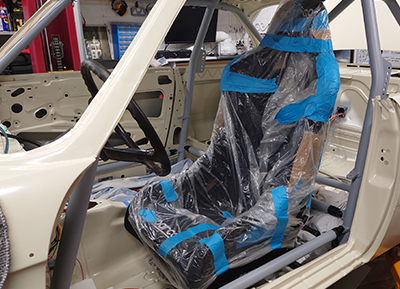
I figured that it would be best to have the cage and other “fixed” items in place before deciding on where to route everything as it might not fit as anticipated. I probably could have done with an extra pair of hands but eventually I managed to get the cage into position on my own and bolted to the floor brackets. It will require a bit of fine-tuning but it’s in for now. I will have to drill a few holes to bolt them all together at some point, but that can wait until later.
The seats would be the next “big” item to fit. I bolted the frames into position before realising the holes to mount the actual seat rails with hadn’t been drilled yet. Shouldn’t be too difficult a job, right? Oh man, how wrong was I? I soon realised that I was left with little space once the door window would be back in – something I simulated by sticking a piece of cardboard in the door. And if I slide the seat too far towards the transmission tunnel, it would impact with the centre console as you slide it forward. Damn, less space available than anticipated - I was hoping there would be a bigger gap to get to the rear seats. Perhaps my daughter will have to climb through the window after all… Anyway, I quickly gave up on the passenger seat until such time I have the centre console in place and know exactly how much space I’ve got. I swapped sides and decided that the driver’s seat would be more important, otherwise I can’t fit the dashboard or the new gauges (I’ll explain in a bit). Same issue, but this time I had no door to wedge any cardboard into. Nothing a bit of tape stuck to the inside of the roof structure couldn’t solve and I quickly found out how little room this seat had as well. Mind you, this one is even more critical as it needs to be in line with the steering wheel. Could result in some very interesting driving if it’s not! Skip forward a few days (3) and we’ve got ourselves a driver’s seat fitted. Time to invest in a drill bit sharpener, as by now they’re starting to become a bit blunt.
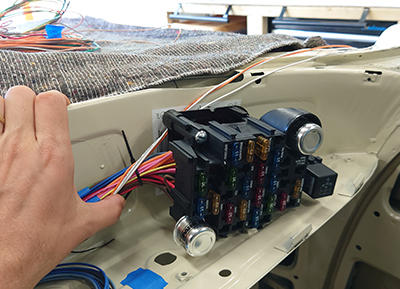
Right, we can move on with the next step. The fuse box needs to be housed somewhere, and it needs to be in a place where easy access is possible. Wait, why not cut the dashboard in half and mount it in front of the passenger’s seat? Absolutely brilliant idea! Oh wait, the window defroster has to go there as well, perhaps less space available than initially thought… Okay, let’s fit the defroster and find out. You’ve probably figured out by now that in order to do one job, a lot of other (small) jobs have to be completed first; To fit the fuse box I need to fit the defroster and dash. To fit the dash, I need the steering column, which needs a seat, which requires a cage, etc… It felt progress was very slow and for every step forward I needed to take two backwards. But hey, I could now start cutting out the big hole for the fuse box. Since the fuse box comes with a significant portion of the wires already in place, I began running the initial routing of the wiring loom. A lot of wires will be added to this in a minute (keep reading), but at least I had an idea of space requirements.
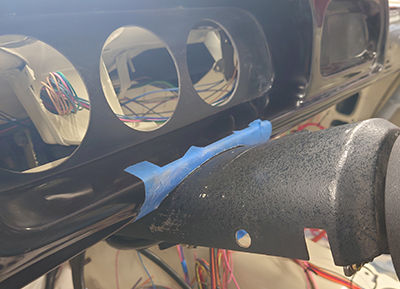
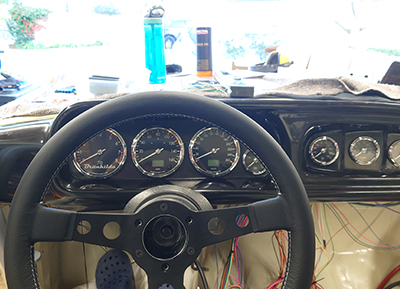
Finally, we can install the dashboard. Actually, we can’t. We need the steering column first. Once I found the bolts needed for this, I discovered that the dash wouldn’t fit anymore, as it came into contact with the top of the column. This left me with two options – either lower the steering column, or cut a piece out the dashboard. See why I needed to fit the seat first? At least now I could get my bum into position to check which option would be the best. You’ve guessed it, the cutting option (obviously). I started with the Mark 1 eyeball, but quickly realised I needed to buy one of those contour tracers. Once received, I then drew the column contour onto the dashboard and started cutting. Little by little I trimmed enough material for the dash to sit flush on top of the column. It was a very slow process and was further delayed by the column needed some additional restoration work to function properly (it can move in and out which changes its position in comparison to the dash). Once that was sorted, and the column fixed in its highest position, I made the final cut and got the dash fitted. Time to drill the holes for the instrument gauges. But before I do, I need to install the new steering wheel, to see what the optimal position of the gauges is to ensure I can see them fully (or at least as much as possible without moving my head). Eventually, I came to a layout in which the tachometer (RPM) is fitted to the left instead of the original “middle” position. It may look a bit “odd” and out of sync but it’s all for a good reason. And frankly, I think it still looks fantastic!
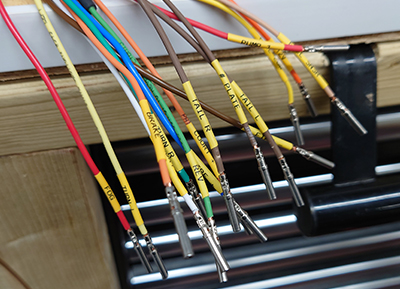
Now then, time to start shopping for some wires. Long story short, I ended up buying different gauges in different colours to (closely) match the already installed wires from the fuse box to aid in problem solving later on. In total, I ordered over 1000 meters of wiring, before realising that when I opened the box, I forgot the black grounding wires. For goodness’ sake, will anything go to plan?
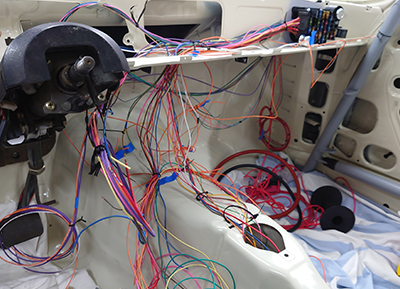
With the bulk of the wiring available, I grabbed the diagrams I’ve designed over the last 12 months and using zip ties to loosely keep them in place throughout the car, I pulled wire by wire, meter by meter, through the car. I figured starting in the boot would be the easiest as most of them only have a single point of termination (either the switch panel or fuse box, not with complicated splices like many of the interior and front wires have). I noticed a few errors on my templates and thankfully was able to sort them out as I went – printing them on A3 was probably the best decision I made before starting this wiring nightmare. A total of 21 wires would run through the rear bulkhead, along with the individual battery cables which would have their own connectors. I’ll provide an in-depth explanation in an upcoming Project C.A.R. episode. With plenty of extra length left on both sides, the time had come to cut the loom in order to make the first connector. All wires have been labelled at both ends and various zip ties define the rough layout and branching of the loom. Okay, let’s cut. Oh, before you do, here’s a tip I discovered directly after cutting - having labels at both ends doesn’t help much if you decide to cut them halfway. Now, where have I left that voltmeter…
Before I end this update, I’ll provide you with a quick outlook on what to expect in the next few weeks/months. I’ll be covering all of them in episodes so hopefully you can learn from my mistakes. First, I need to complete the wiring, or at least the rear section. Then I’ll have to design the remaining dashboard and centre console, which then allow me to make the switch board and all other relevant connections. The fuel line will have to be installed along with the fire extinguisher – both of which require the engine to be installed again. I’ll then continue with the engine bay itself, both wiring and components that are still missing. At some point, I’ll have to figure out how to convert this car to house a modern A/C system and plumb/wire all that in, too. I’m still in need of a new fuel tank, which requires designing and manufacturing. And I’d imagine the passenger would like a seat at some point as well…
In a nutshell, plenty of work left to do, and hopefully another (big) update for you to enjoy soon!
Return to Previous Page
Niek Nijsen Ltd.
Comp. Reg. (UK): 13778584
VAT. Reg. (UK): 398 4757 24
info@nieknijsen.com
Copyright
Niek Nijsen Ltd. © 2008 -
All Rights Reserved
Privacy Policy | Terms of Business