
Custom Everything
Posted on March 05, 2023 by Niek Nijsen
Yes, I’ve managed it! I have provided you with 2 (!) updates in 6 months! I agree, one heck of an achievement, I’m proud of it myself, too. All joking aside though, it’s been way too long since the last update (I wonder if that date is wrong, probably not) and although the garage was colder than the fridge for most of the winter, I have since been able to do some work on the car. Especially with the help of my dad who was here for a week during my daughter’s birthday. Anyway, enough of the introduction pleasantries, you’re here to find out what’s been going on with the restoration. Let’s get on with it!
In the previous update (“She’s Back”), I managed to crush the door soon after the car was back. You’ll be pleased to hear that Chris and his colleagues have repaired said door and is now ready to be fitted again. Since access is much easier without it, they’ve kindly offered to keep it in storage until the car goes back to them for paint. Thanks Chris!
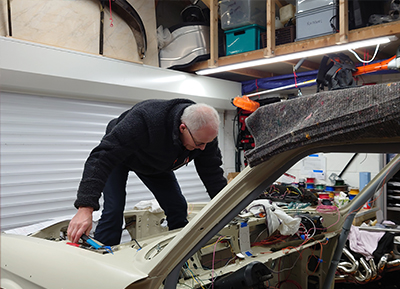
The passenger is still lacking his/her/their seat and will do so for the foreseeable future, as I’ve realised it will only be in my way and it’s better to do this towards the end of all my works. On top of that, we actually removed the passenger door as well, this time in one piece, to facilitate easier access while working. You’ll notice that the bonnet/hood is missing, too. That’s now laying on the roof of the car to make work in the engine bay possible. All it needs now is a big hole in the floor and we’ve got ourselves a Flintstone car :)
The first step would be to enlarge the “hole” in which the new AC unit will sit. Once that was done, we would need to put the engine back in the car before being able to do anything else. With that would come the new gearbox and mounting bracket issue. This can then be followed by all the auxiliaries that need a home, along with the required plumbing and wiring. I think I’ve mentioned it before, but it seems that if I want to sort out one thing, I need to do 3 or 4 other things first. Why I thought starting with the wires was a good idea is still beyond me. Anyway, I digress. Let’s start cutting a perfectly restored bodyshell.
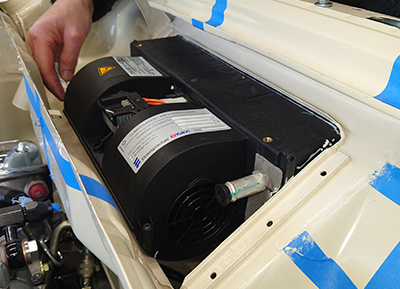
The new A/C unit we selected, is slightly too wide for the existing heater hole, a whopping 7 mm to be exact. While the engine bay was still empty and very little else in the way, my dad decided this would be the best place to start and with the help of a few clamps, one of the door hinges, and a big hammer, he went to work. The original brackets and strengthening rails were drilled out and removed, which quickly followed with a lot of banging, cutting, and grinding. Once the hole was big enough, the rails were welded back in place, and everything was primed and re-painted to protect the now exposed steel. The actual fitting of the unit and accompanying parts will follow later in this update, bear with me.
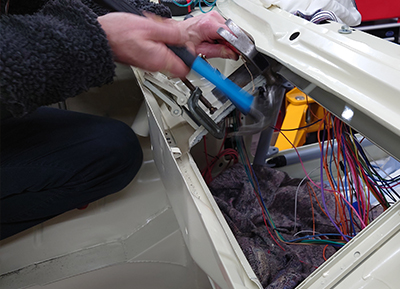
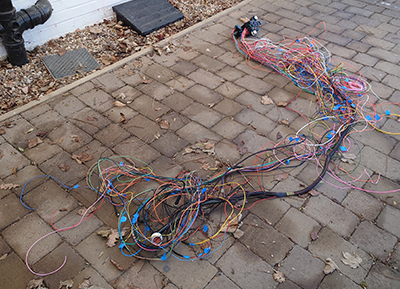
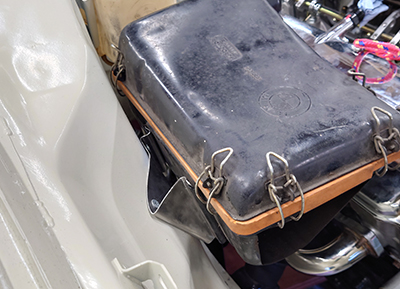
Okay, remember where a bit earlier I questioned myself on why I started with the wiring first? Well, long story short, we decided it was better to remove it all again, as the spaghetti chaos is in the way more often that it’s not. I may have uttered a few naughty words, but eventually the entire loom was removed from the car. Once it was out, I realised this was actually a great opportunity for me to sort out some of the wires I wasn’t happy with, especially on the fuse block itself. The type I ordered is the “through bulkhead” instead of a standard “grommet” type unit. As a result of where I placed it, a lot of the wires go from the steering wheel (located on the left) to the fuse block (located on the right) and back again to then go into the engine bay. A far easier and quicker way would be to just go from wheel to engine bay, obviously. I still need to adjust my drawings and physical wire layout, but I’ve now removed these wires and connections on the fuse block and tidied most of the wires up at the same time. The end result will be a far cleaner loom and less wires going criss-cross through the car unnecessarily.
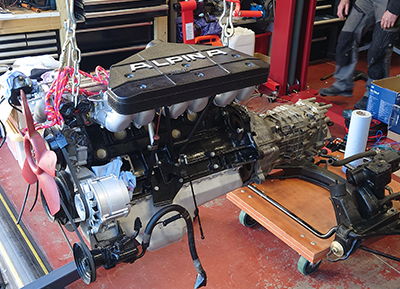
Time to fit the engine. After collecting the engine crane from a kind neighbour, we removed the block from its stand and began the process of merging the new gearbox. As most of you will know, I’m swapping the original 3-speed automatic with a 5-speed manual. In theory this should be a fairly straight swap, which it actually is. The bellhousing fits nicely and only miss-aligns a single bolt, which is good enough for me (this is solvable by enlarging the hole and using a bigger bolt, which I might do anyway). The most important part is that it seals correctly, and from what I can see, it does. I did consider using the original bellhousing, but because it’s slightly different for an automatic, it wouldn’t work. I haven’t included any of the internal workings yet such as the clutchplate, as it didn’t affect the ability to fit the gearbox to the car. Time to lower the engine onto the subframe and bolt it all onto the car. Aside from a few small hick-ups with one of the bolts refusing to seat properly (he changed his mind very quickly when we showed him the big hammer), the engine and gearbox merged with the car seamlessly. However, with regards to the gearbox, this is where things get interesting, because I’ve noticed a lot of people that do this conversion, complain about the mounting bracket for the rear end of the box. Instead of paying 600$ for a very basic and not too-good-looking alternative, we decided to change the mounts on the chassis instead. A new steel plate was made, and a nut welded on, which sits in the little rail and allows the standard bracket to be bolted on again. Success, and our first home-made custom bracket is done.
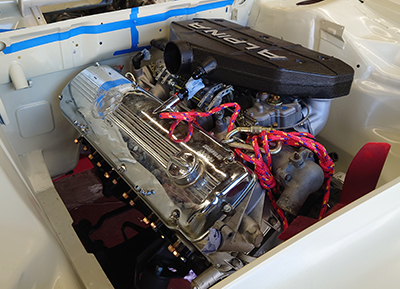
The next major part to be installed would be the new air filter, which is standard for the CSi and CSL models, but because mine used to be a CS, it was never part of the car before. The original for my car sits on top of the engine, whereas the new one is mounted to the right-side of the engine bay. Unfortunately, this also meant that the mounting bracket was missing. Based on photos we could find, my dad made the bracket from scratch using 1.5mm stainless steel, a hammer, and some arm muscle. After a lot of test fitting and perfecting the bracket, the filter housing was mounted to the car. Now at this point you would normally drill holes in the shell and bolt it all onto the car using your standard nut/bolt combination. Since we didn’t want to have any open holes in the car, we decided to use closed nut rivets instead. These are basically rivets you insert into the hole (you still need to drill one), but when “pulled”, form a closed nut with thread inside for the bolt. Basically, although my description is pretty poor, you end up with a closed nut to mount things to, thus sealing the car from any water potentially causing rust down the line. To be extra save, we used body sealer before placing the nut rivet. Somehow, I bought the wrong tool, but with a bit of ingenuity, a bolt, and a wrench, we managed to fit them after all. This process has been and will be repeated many more times as I intend to mount all auxiliaries, cable clamps, and brackets using these nut rivets.
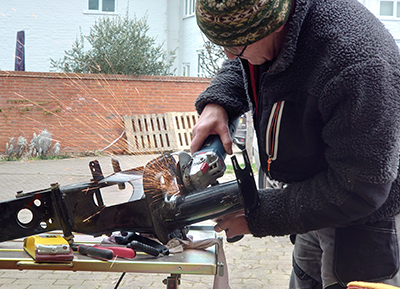
Now came the moment of truth though, with the new carburettors and airbox, would the steering column and brake booster still fit? Short answer: Not really. Long answer: Yes, but with the engine running and vibrations that come along with it, they would constantly be in contact and over time damage both parts. Not optimal. The initial solution involved a big hammer and a large socket, which were used to “reshape” the brake booster. Sadly, this turned out to be insufficient. Okay, well let’s grind some off the inlet manifold. Hmm, still insufficient space. Mind you, it is worth mentioning that I decided to retain the original (large) brake booster, which obviously was at the cause of the issue. But we agreed it would pay off during the long-distance rallies, since less pedal force would be required. Anyway, the only option left at this point is to change the angle of the steering column. The pedal box was taken apart and the angle grinder was introduced. What followed was a rain of sparks and a 1 mm cut for about 75% of the pipe. This was then bent so a bigger offset would create the clearing we needed from the engine. Once happy it all fitted, the steering column was welded together again. Granted, we now need to make a new mounting bracket for support, but the major work is done.
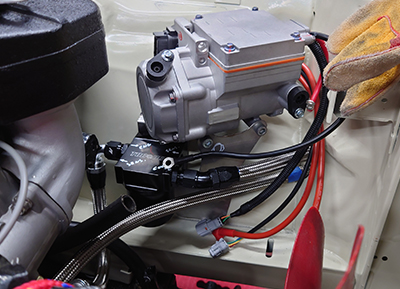
Great, the items we need to fit are getting smaller with each one. However, we’re still trying to house a few big ones, one of them being the new A/C unit and accompanying compressor. On top of that, we also need to house the new condenser/radiator. I’ve already covered enlarging the hole that houses the new A/C unit, but we needed to find a location for the compressor next. This is an electrical one, that’s not mounted on the engine block, and can basically sit wherever we want (to an extent). Inside the car wasn’t much of an option due to the noise (and routing of the hoses), and the boot was even less suitable. The best place would be where previously the battery was housed. Fantastic idea, although which idiot decided to cut the tray that used to be there and would be perfect for the job?! Oh yeah, that would be me if memory serves me right. Oops. Thankfully, the missing tray actually led us to the ability to house the new oil filter nearby and combine them in a single mounting bracket. Granted, it would take a bit of engineering and a lot of hammering and bending to make said bracket, but it would be a very good looking and practical solution. Sod it, let’s take the challenge. I have to admit, once we were happy with the location of both items, I was very little involved in the design process, I left that to the real engineer. Jump forward a few hours and dad proudly showed his latest creation. I was genuinely impressed and even happier when everything fitted where it was intended. Add a few of the nut rivets and we have more parts in the car and less outside. Hey, it’s progress!
What about the radiator and accompanying plumbing? Well, that would be the next problem. The oil filter was first, and although the hose connectors acted like a massive pain, we eventually managed to get the hoses where we wanted them once we drilled two new holes in a perfectly restored bodyshell. Somehow, we need to get from the engine bay to the front of the car in order to connect the oil cooler. The latter will sit next to the condenser/radiator for the A/C, but both will need a new bracket to be made, which is still outstanding. For now, the oil hoses are simply hanging where they should roughly end up. The same goes for the A/C plumbing, which we briefly “installed” so we could determine their route and mark where the clamps would have to go to secure them. Once the photos were taken, these were removed again – I haven’t cut them to size yet, so they had to come out anyway.
The wiring to the new dashboard has been causing me headaches for some time now, and I couldn’t figure out what the best way would be to route the wires, which would still allow for easy removal of the dashboard if required. Various locations were tried and at first, I did have the (almost) perfect location. Sadly though, because of the new A/C unit, this would no longer be an option. Eventually we came up with the idea of simply creating a new bracket for it and mount the connector to the side of the original instrument panel mounting. Since this was the first bracket I designed on my own, with a few directions from the master, I’m quite proud of the result. And no, I don’t care it’s a simple 90-degree bend piece of steel. It also has 7 holes in it! Anyway, the new location allows for easy disconnect of the dashboard, keeping access to a premium, while minimising wire length at the same time. You are correct, I am indeed a happy customer.
I’ve been messing about with this idea for a while now, and we already knew that the new AC unit would require an upgraded alternator. While hunting for one that would provide the required amps (175!), I also started looking for an upgraded starter motor. Not that the current one is broken, but it is old, and reliability is an issue, especially during competitions. Not optimal, so a replacement would be high on the list. Eventually I found an alternator that fits from WospPerformance, and the starter motor from PowerLite. They should hopefully prove to be a straight-forward swap, which I guess we’ll find out once they’re here. Fingers crossed.
With all this custom work, we agreed that it would probably be best to install in some very useful equipment that would repay itself tenfold: a 3D scanner! Yes, I know there’s people out there that provide the service but having one myself allows me to quickly scan a single item or entire parts of the car as and when required. For instance, a cover for the heater still needs to be made from scratch and having everything in a 3D model would certainly help with that. Let alone all the other parts that need doing, including a whole new lower dashboard and centre panel. I know, but more on that in the future once the scanner has arrived (early April hopefully).
I think that’s pretty much everything we’ve done so far. I know, it’s been fairly quiet on the video front. I haven’t uploaded one in a while, but you’ll be pleased to hear I have a lot of footage of all the above work that should provide you with at least one if not two episodes. I just need to find some time to record the remaining parts and edit it all. So, stay tuned!
P.s. I've uploaded a lot of new photos to the restoration gallery as well. Enjoy!
Return to Previous Page


Niek Nijsen Ltd.
Comp. Reg. (UK): 13778584
VAT. Reg. (UK): 398 4757 24
info@nieknijsen.com
Copyright
Niek Nijsen Ltd. © 2008 -
All Rights Reserved
Privacy Policy | Terms of Business